2. Version Control with Git
2.1. Why version control?
A program is rarely written in one go but rather evolves through a number of stages where the code is improved, for example by fixing errors or improving its functionality. In this process, it is generally a good idea to keep old versions. Occasionally, one has an apparently good idea of how to improve a program, only to find out somewhat later that it was not such a good idea after all. Without having the original version available, one might have a hard time going back to it.
Often, old versions are kept in an informal way by inventing filenames to distinguish different versions. Unless one strictly abides by a naming convention, sooner or later one will be unable to identify the stage of development corresponding to a given file. Things become even more difficult if more than one developer is involved.
The potential loss of a working program is not the only motivation to keep a history of program versions. Suppose that a version of the program is used to compute scientific data and suppose that the program is further developed, e.g. by adding functionality. One might think that it is unnecessary to keep the old version. However, imagine that at some point it turns out that the program contains a mistake resulting in erroneous data. In such a situation, it may become essential to know whether the data obtained previously are affected by the mistake or not. Do the data have to be discarded or can continue to use them? If the version of the code used obtain the data is documented, this question can be decided. Otherwise, one probably could not trust the old data anymore.
Another reason of keeping the history of a program is to document its evolution. The motivation for design decisions can be made transparent and even bad decisions could be kept for further reference. In a scenario where code is developed by several or even a large number of people, it might be desirable to know who is to be praised or blamed for a certain piece of code. Version control systems often support collaborative development by providing tools to discuss code before accepting the associated changes and by the possibility of easily going back to an older version. In this way, trying out new ideas can be encouraged.
A version control system storing the history of a software project is clearly an invaluable tool. This insight is anything but new and indeed as early as in the 1970s, a first version control system, SCCS (short for source code control system), was developed. Later systems in wide use include RCS (revision control system) and CVS (concurrent versions system), both developed in the last century, Subversion developed around the turn of the century and more recent systems like Git, Mercurial and Bazaar.
Here, we will discuss the version control system Git created by Linus Torvalds in 2005. Its original purpose was to serve in the development of the Linux kernel. In order to make certain aspects of Git better understandable and to highlight some of its advantages, we will consider in the following section in some more detail different approaches to version control.
2.2. Centralized and distributed version control systems
Often software is developed by a team. For the sake of illustration let us think of a number of authors working jointly on a text. In fact, scientific manuscripts are often written in (La)TeX which can be viewed as a specialized programming language. Obviously, there exists a probability that persons working in parallel on the text will make incompatible changes. Inevitably, at some point the question arises which version should actually be accepted. We will encounter such situations later as so-called merge conflicts.
Early version control systems like RCS avoided such conflicts by a locking technique. In order to change the text or code, it was necessary to first lock the corresponding file, thus preventing other persons from modifying the same file at the same time. Unfortunately, this technique tends to impede parallel development. For our example of manuscript, it is perfectly fine if several persons work in parallel on different sections. Therefore, locking has been found not to be a good idea and it is not substitute for communication between team members about who is doing what.
More modern version control systems are designed to favor collaboration within a team. There exist two different approaches: centralized version control systems on the one hand and distributed version control systems on the other hand. The version control system Git, which we are going to discuss in more detail in this chapter, is a distributed version control system. In order to better understand some of its aspects, it is useful to contrast it with a centralized version control system like Subversion.
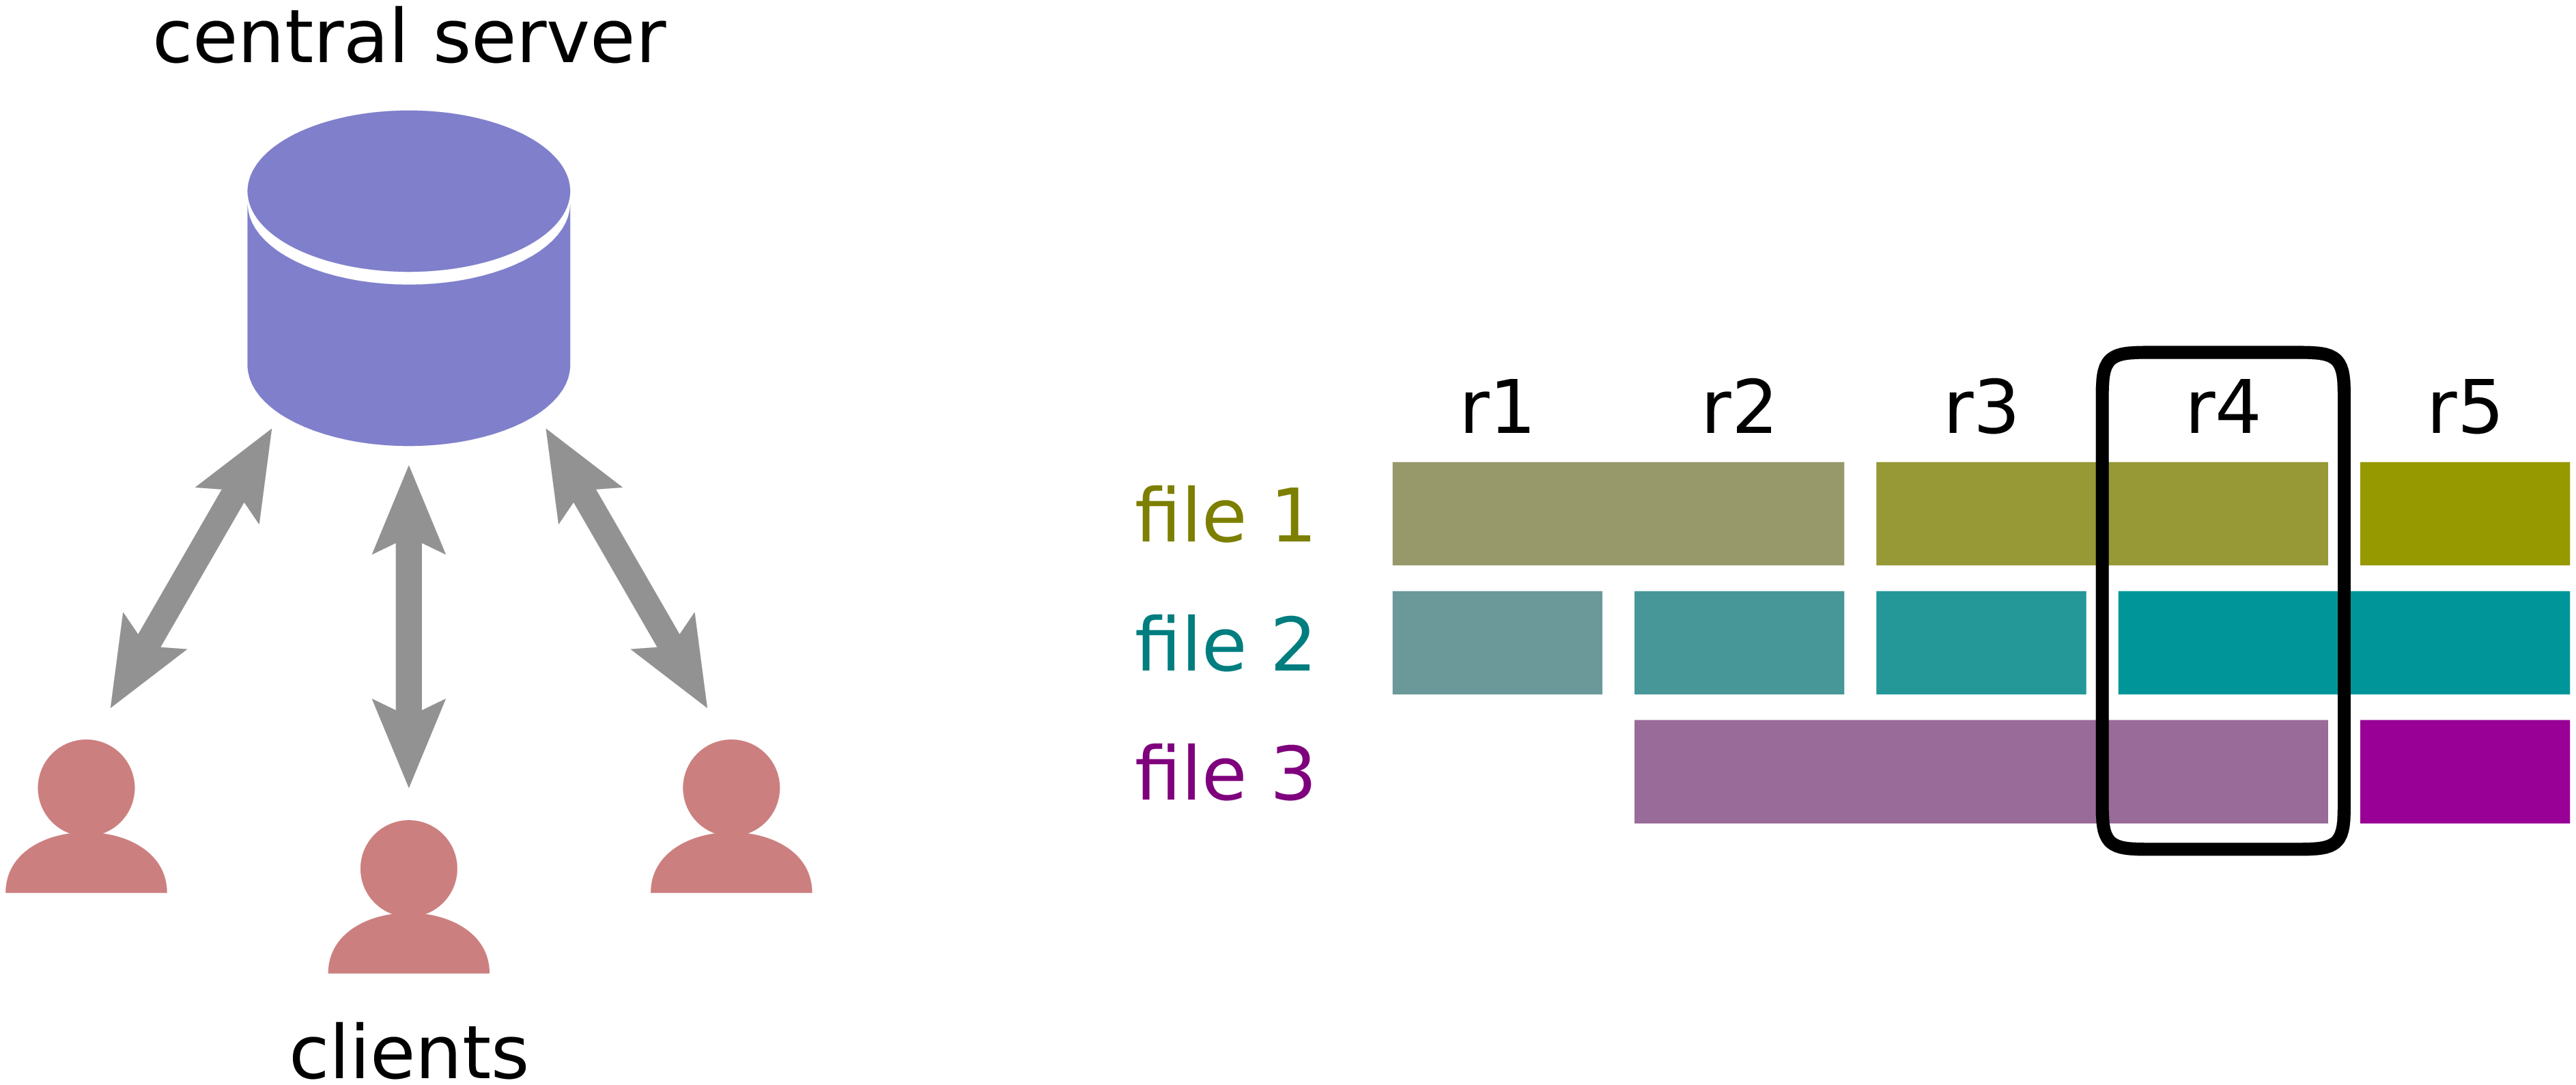
Figure 2.1 A centralized version control system contains a well defined set of files at any given moment in time which can be referred to by a sequential revision number.
More modern version control systems are designed to favor collaboration within a team. There exist two different approaches: centralized version control systems on the one hand and distributed version control systems on the other hand. The version control system Git which we are going to discuss in more detail in this chapter is a distributed version control system. In order to better understand some of its aspects, it is useful to contrast it with a centralized version control system like Subversion.
The basic structure of a centralized version control system is depicted in the left part of Figure 2.1. One or more developers, referred to as clients here, exchange code versions via the internet with a central server. At any moment of time, the server contains a definite set of files, i.e. a revision which is numbered sequentially as indicated in the right part of Figure 2.1. From one revision to the next, files can change or remain unchanged and files can be added or removed. The price to pay for this simple sequential history is that an internet connection and a working server is needed in order to create a new revision. A developer cannot create new revisions of the code while working off-line, an important drawback of centralized version control systems.
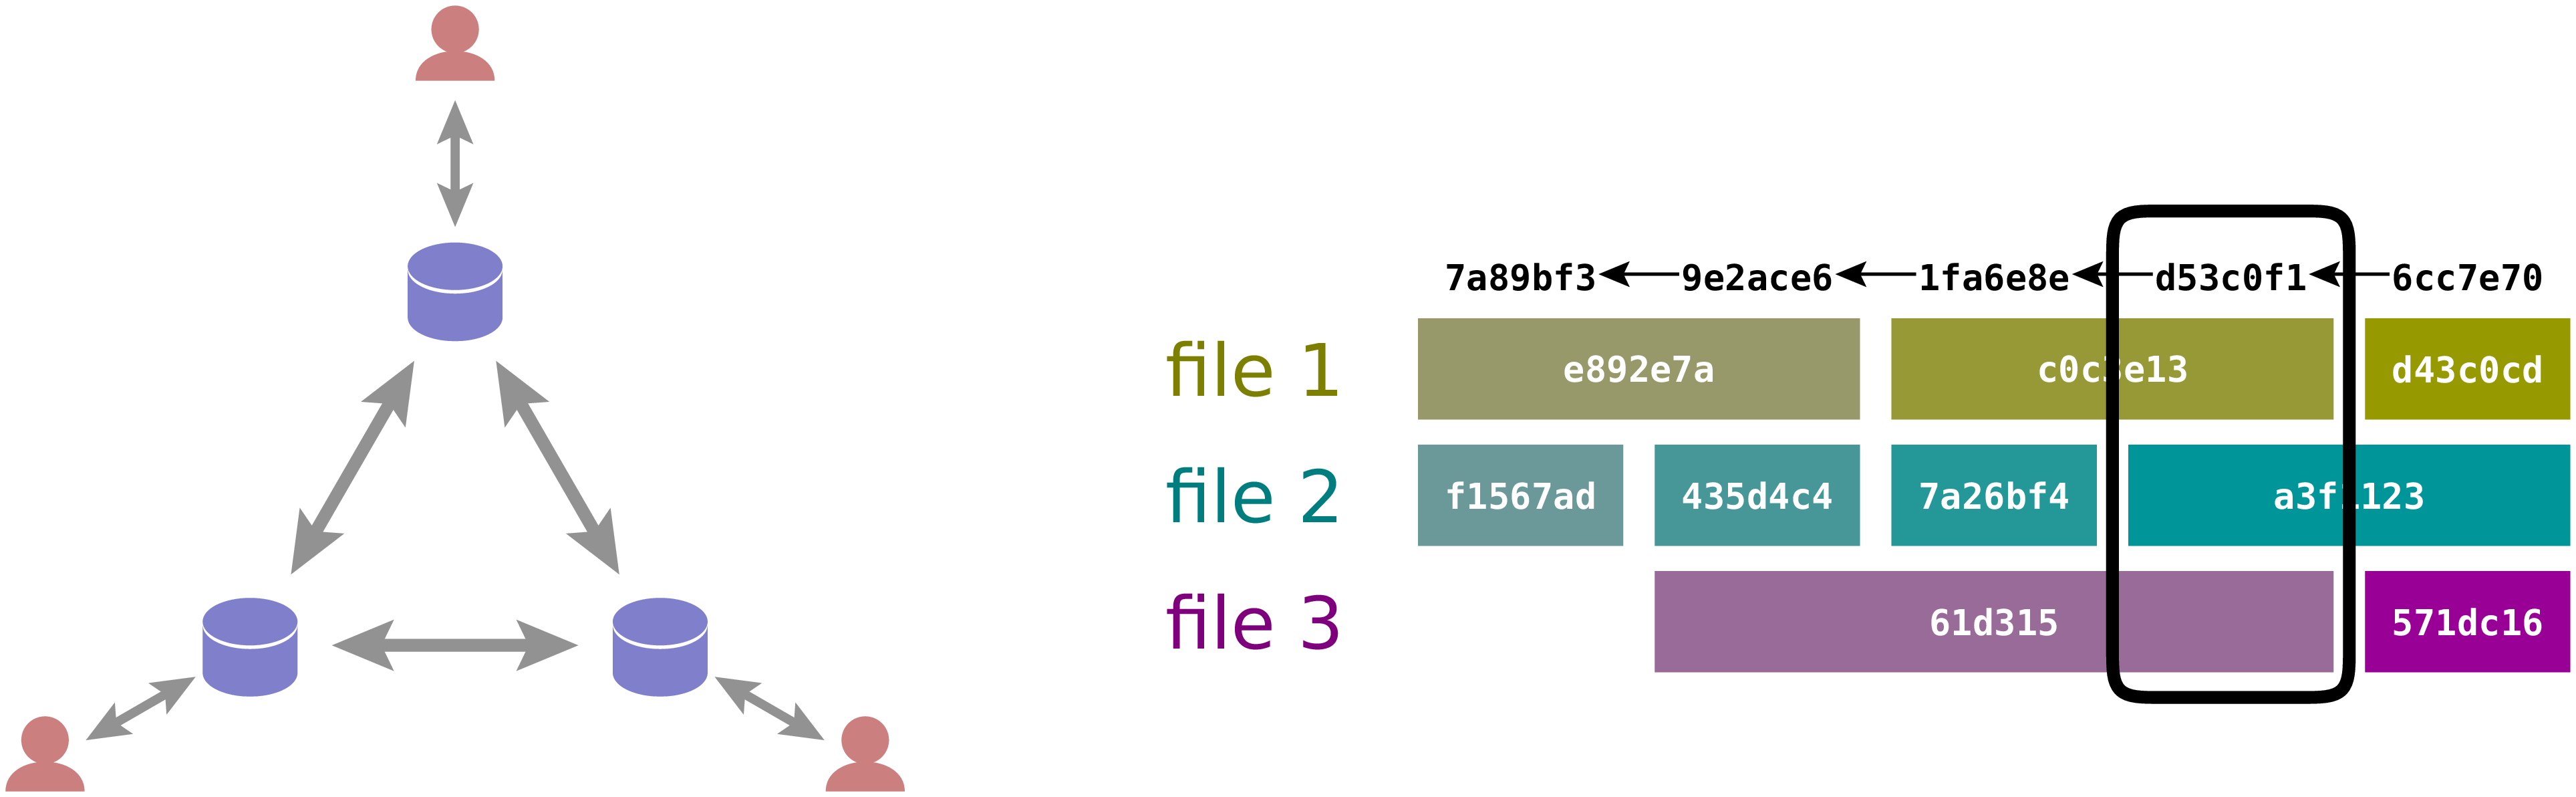
Figure 2.2 In a distributed version control system each user keeps file versions in a local repository and exchanges versions with other repositories when needed. As a consequence no global sequential history can be defined.
As an alternative, one can use a distributed version control system which is schematically represented in Figure 2.2. In such a setup, each developer keeps his or her own versions in a local repository and exchanges files with other repositories when needed. Due to the local repository, one can create a new version at any time, even in the absence of an internet connection. On the other hand, there exist local version histories and the concept of a global sequential revision numbering scheme does not make sense anymore. Instead, Git uses hexadecimal hash values to identify versions of individual files and sets of files, so-called commits, which reflect changes in the code base. The main point to understand here is that the seemingly natural sequential numbering scheme cannot work in a distributed version control system.
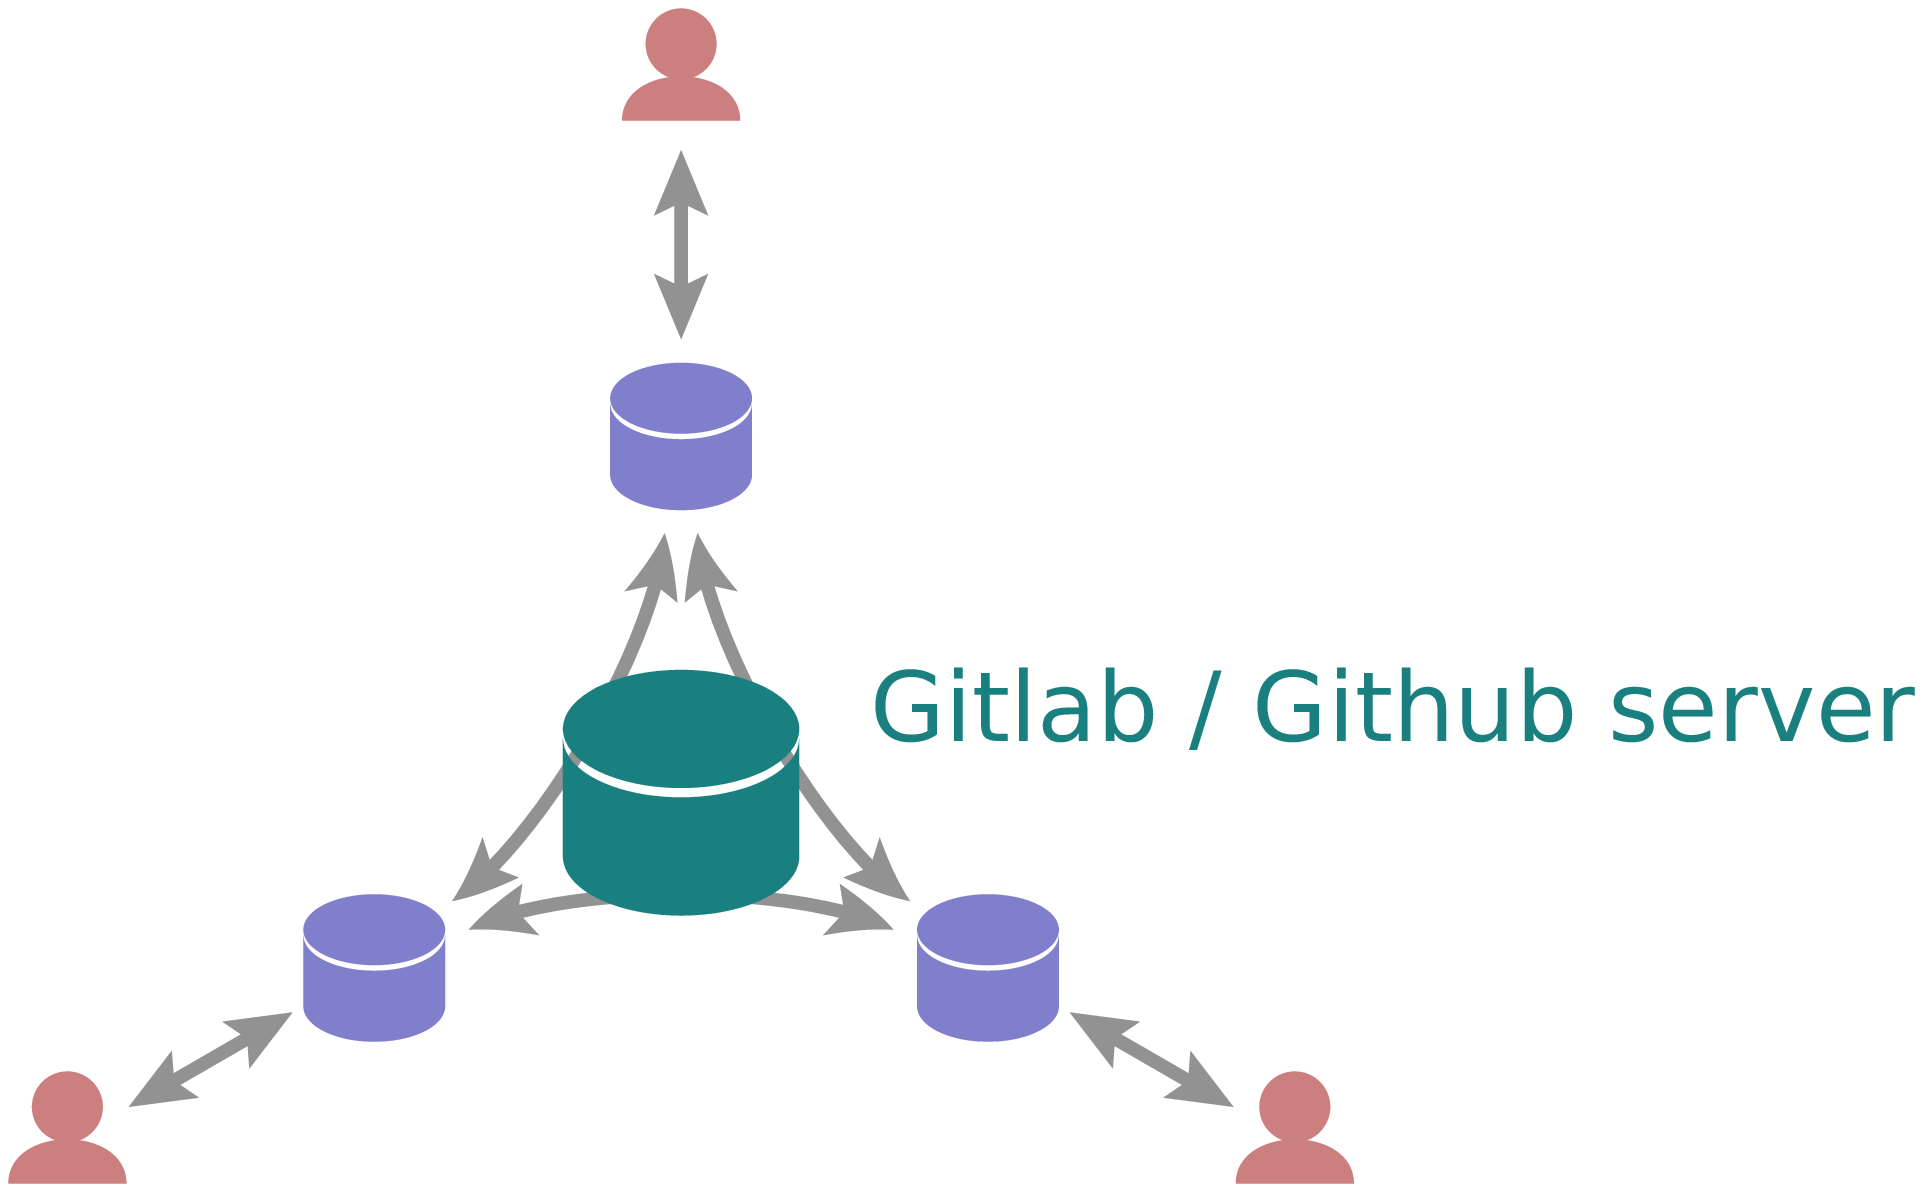
Figure 2.3 A typical setup for the distributed version control system Git uses a central server to exchange versions between local repositories.
In most cases, a distributed version control system is not implemented precisely in the way presented in Figure 2.2 as it would require communication between potentially a large number of local repositories. A setup like the one shown in Figure 2.3 is typical instead. The important difference as compared to the centralized version control system displayed in Figure 2.1 consists in the existence of local repositories where individual developers can manage their code versions even if disconnected with the central server. The difference is most obvious in the case of a single developer. Then, a local repository is completely sufficient and there is no need to use another server.
A central server for the use with the version control system Git can be set up based on GitLab. Many institutions are running a GitLab instance [1]. In addition, there exists the GitHub service at github.com. GitHub is popular among developers of open software projects for which it provides repositories free of charge. Private repositories can be obtained at a monthly rate, but there exists also the possibility to apply for temporary free private repositories for academic use. In later sections, when discussing collaborative code development with Git, we will specifically address GitLab, but the differences to GitHub are usually minor.
In the following sections, we will start by explaining the use of Git in a single-user scenario with a local repository. This knowledge also forms the basis for work in a multi-developer environment using GitLab or GitHub.
2.3. Getting help
Before starting to explore the version control system Git, it is useful to
know where one can get help. Generally, Git tries to be quite helpful even
on the command line by adding useful hints to its output. As the general structure
of a Git command starts with git <command>, one can ask for help as follows:
$ git help
usage: git [--version] [--help] [-C <path>] [-c <name>=<value>]
           [--exec-path[=<path>]] [--html-path] [--man-path] [--info-path]
           [-p | --paginate | -P | --no-pager] [--no-replace-objects] [--bare]
           [--git-dir=<path>] [--work-tree=<path>] [--namespace=<name>]
           <command> [<args>]

These are common Git commands used in various situations:

start a working area (see also: git help tutorial)
   clone             Clone a repository into a new directory
   init              Create an empty Git repository or reinitialize an existing one

work on the current change (see also: git help everyday)
   add               Add file contents to the index
   mv                Move or rename a file, a directory, or a symlink
   restore           Restore working tree files
   rm                Remove files from the working tree and from the index
   sparse-checkout   Initialize and modify the sparse-checkout

examine the history and state (see also: git help revisions)
   bisect            Use binary search to find the commit that introduced a bug
   diff              Show changes between commits, commit and working tree, etc
   grep              Print lines matching a pattern
   log               Show commit logs
   show              Show various types of objects
   status            Show the working tree status

grow, mark and tweak your common history
   branch            List, create, or delete branches
   commit            Record changes to the repository
   merge             Join two or more development histories together
   rebase            Reapply commits on top of another base tip
   reset             Reset current HEAD to the specified state
   switch            Switch branches
   tag               Create, list, delete or verify a tag object signed with GPG

collaborate (see also: git help workflows)
   fetch             Download objects and refs from another repository
   pull              Fetch from and integrate with another repository or a local branch
   push              Update remote refs along with associated objects

'git help -a' and 'git help -g' list available subcommands and some
concept guides. See 'git help <command>' or 'git help <concept>'
to read about a specific subcommand or concept.
See 'git help git' for an overview of the system.
Information on a specific command is obtained by means of git help <command>.
Furthermore, Git provides a number of guides which can be read in a terminal window. A list of available guides can easily be obtained:
$ git help -g

The common Git guides are:
   attributes          Defining attributes per path
   cli                 Git command-line interface and conventions
   core-tutorial       A Git core tutorial for developers
   cvs-migration       Git for CVS users
   diffcore            Tweaking diff output
   everyday            A useful minimum set of commands for Everyday Git
   glossary            A Git Glossary
   hooks               Hooks used by Git
   ignore              Specifies intentionally untracked files to ignore
   modules             Defining submodule properties
   namespaces          Git namespaces
   repository-layout   Git Repository Layout
   revisions           Specifying revisions and ranges for Git
   submodules          Mounting one repository inside another
   tutorial            A tutorial introduction to Git
   tutorial-2          A tutorial introduction to Git: part two
   workflows           An overview of recommended workflows with Git

'git help -a' and 'git help -g' list available subcommands and some
concept guides. See 'git help <command>' or 'git help <concept>'
to read about a specific subcommand or concept.
See 'git help git' for an overview of the system.
For a detailed discussion of Git, the book Pro Git by Scott Chacon and Ben Straub is highly recommended. Its second edition is available in printed form online where also a PDF version can be downloaded freely. By the way, the book Pro Git as well as the present lecture notes have been written under version control with Git.
2.4. Setting up a local repository
The use of a version control system is not limited to large software projects but makes sense even for small individual projects. A prerequisite is the installation of the Git software which is freely available for Windows, MacOS and Unix systems from git-scm.com. This Git installation can be used for all projects to be put under version control and we assume in the following that Git is already installed on the computer. Even though some graphical user interfaces exist, we will mostly discuss the use of Git on the command line.
Putting a new project under version control with Git is easy. Once a directory exists in which the code will be developed, one initializes the repository by means of:
$ git init
Note that the dollar sign represents the command line prompt and should not be
typed. Depending on your operating system setup, the dollar could be replaced by
some other character(s). Initializing a new repository in this way will create a
hidden subdirectory called .git in the directory where you executed the command.
The directory is hidden to avoid that it is accidentally deleted.
Attention
Never delete the directory .git unless you really want to. You will
lose the complete history of your project if you did not backup the project
directory or synchronized your work with a GitLab server or GitHub. Removing
the project directory will remove the subdirectory .git as well.
The newly created directory contains a number of files and subdirectories:
$ ls -a .git
.  ..  branches  config  description  HEAD  hooks  info  objects  refs
Refrain from modifying anything here as you might mess up files and in this way lose parts or all of your work.
After having initialized your project, you should let Git know about your name and your email address by using the following commands:
$ git config --global user.name <your name>
$ git config --global user.email <your email>
where the part in angle brackets has to be replaced by the corresponding information. Enclose the information, in particular your name, in double quotes if it contains one or more blanks like in the following example:
$ git config --global user.name "Gert-Ludwig Ingold"
This information will be used by Git when new or modified files are committed to the repository in order to document who has made the contribution.
If you have globally defined your name and email address as we did here, you do not need to repeat this step for each new repository. However, you can overwrite the global configuration locally. This might be useful if you intend to use a different email address for a specific project.
There are more aspects of Git which can be configured and which are documented in Section 8.1 of the Git documentation. The presently active configuration can be inspected by means of:
$ git config --list
For example, you might consider setting core.editor to your preferred editor.
2.5. Basic workflow
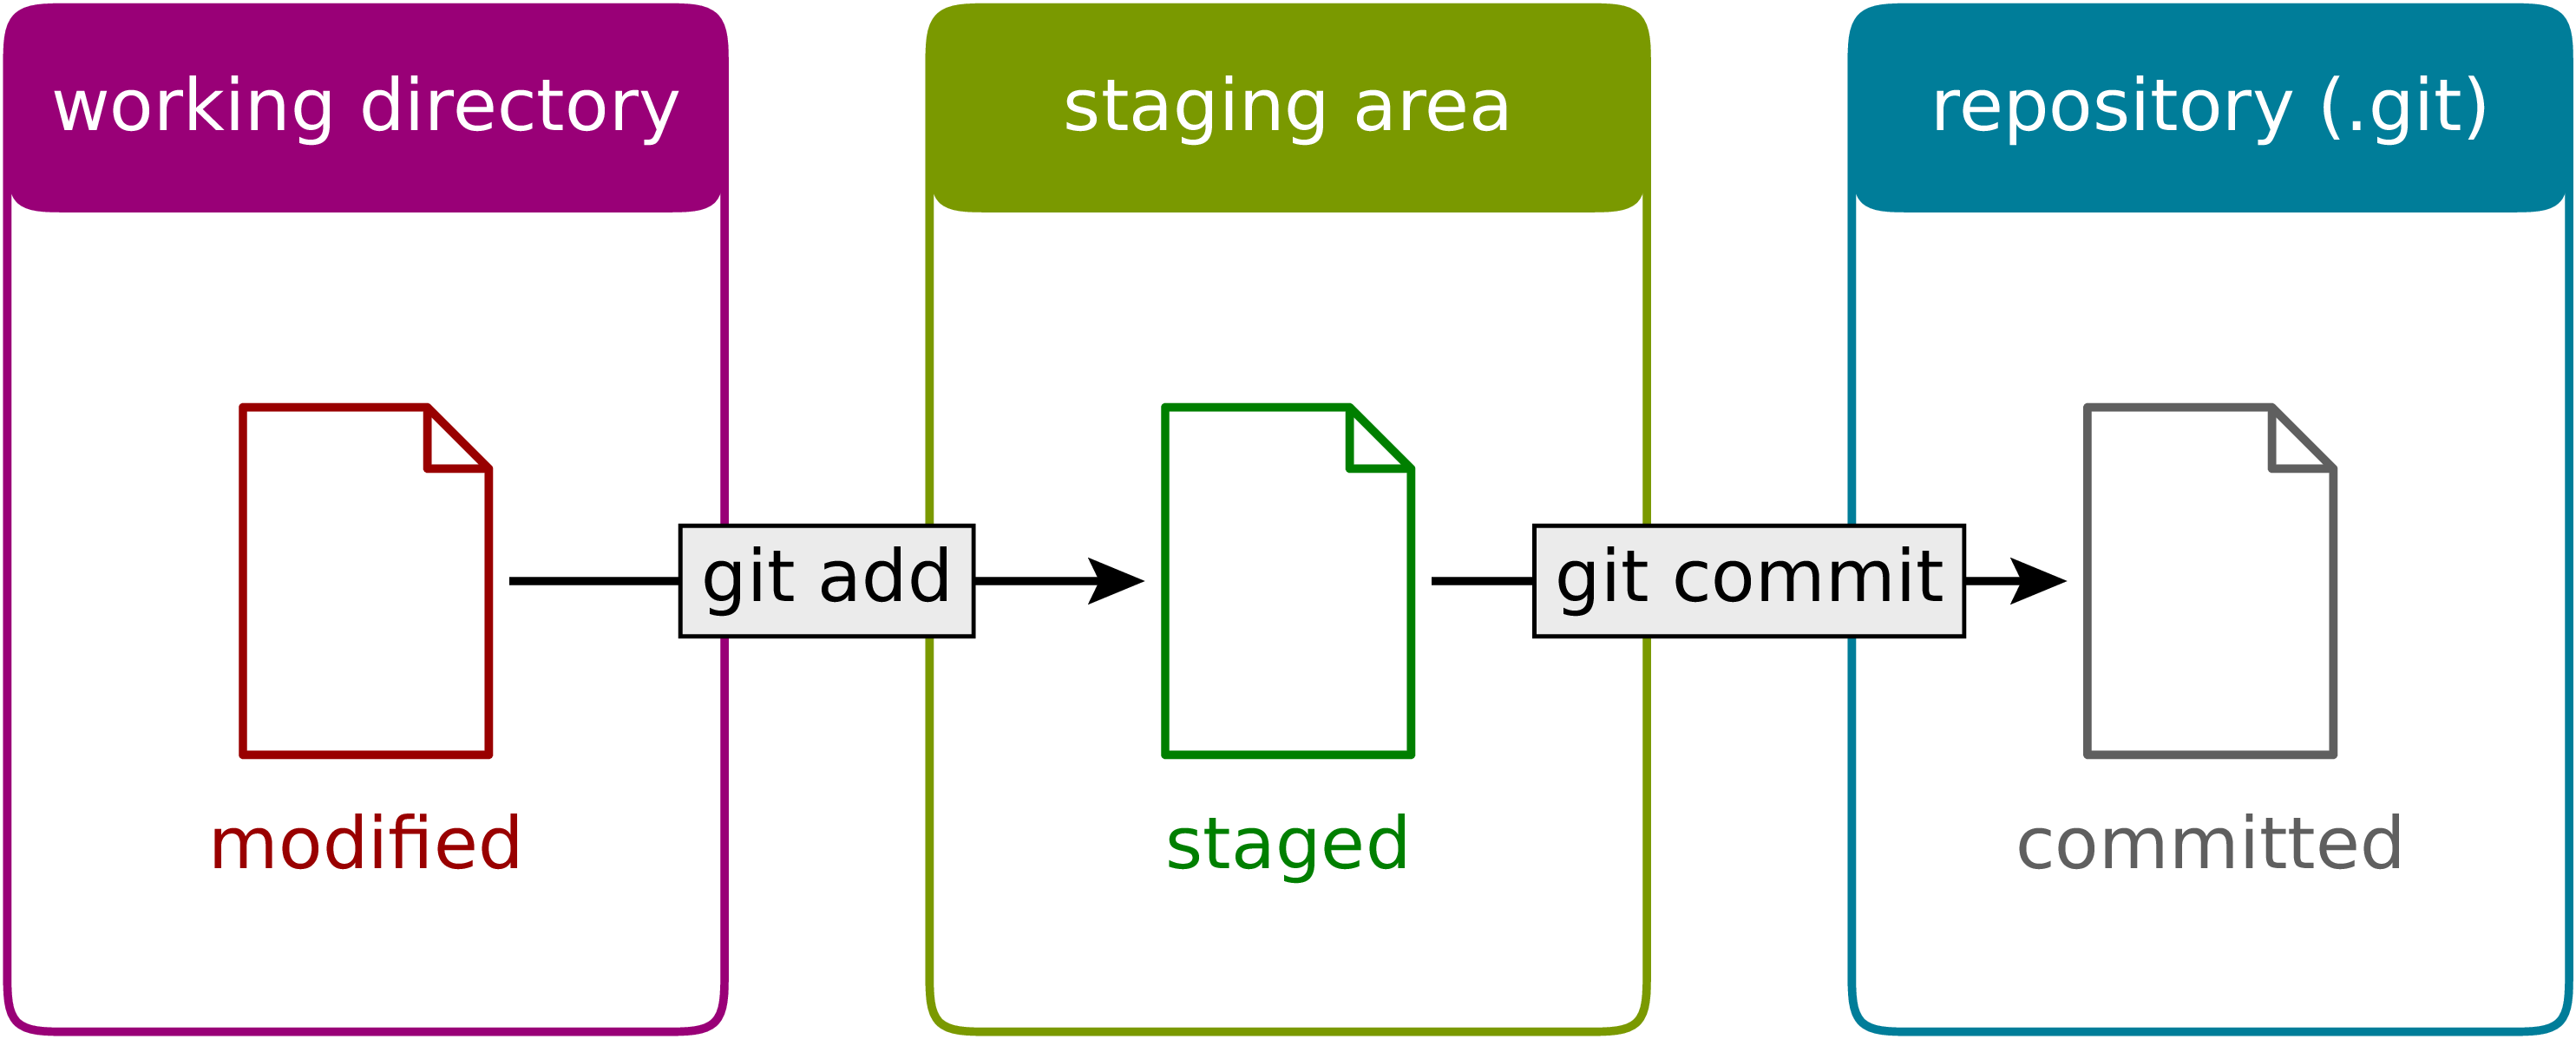
Figure 2.4 The transfer of a file to the repository is a two-step process. First one or more files are added to the staging area. In a second step, the files are committed to the repository.
A basic step in managing a project under version control is the transfer of one
or more new or modified files to the repository where all versions together
with metainformation about them is kept. What looks like a one-step process is
actually done in Git in two steps. For beginners, this two-step process often
gives rise to confusion. We therefore go through the process by means of an
example and make reference to Figure 2.4 where the two-step process is
illustrated. A convenient way to check the status of the project files is the
command git status. When working with Git, you will use this command often
to make sure that everything works as expected or to remind yourself of the status
of the project files.
Suppose that we have just initialized our Git repository as explained in the previous section. Then, Git would report the following status:
$ git status
On branch master

No commits yet

nothing to commit (create/copy files and use "git add" to track)
The output first tells us that we are on a branch called master
[2]. Later, we will discuss the concept of branches and it
will be useful to know this possibility of finding out the current branch. For
the moment, we can ignore this line. Furthermore, Git informs us that we not
committed anything yet so that the upcoming commit would be the initial one.
However, since we have not created any files, there is nothing to commit. As
promised earlier, Git tries to be helpful and adds some information about what
we could do. Obviously, we first have to create a file in the project
directory.
So let us go ahead and create a very simple Python file:
print("Hello world!")
Now, the status reflects the fact that a new file hello.py exists:
$ git status
On branch master

No commits yet

Untracked files:
  (use "git add <file>..." to include in what will be committed)
        hello.py

nothing added to commit but untracked files present (use "git add" to track)
Git has detected the presence of a new file but it is an untracked file which
will basically be ignored by Git. As we ultimately want to include our small
script hello.py into our repository, we follow the advice and add the
file. According to Figure 2.4 this corresponds to moving the file
to the so-called staging area, a prerequisite to ultimately committing the file
to the repository. Let us also check the status after adding the file:
$ git add hello.py
$ git status
On branch master

No commits yet

Changes to be committed:
  (use "git rm --cached <file>..." to unstage)
        new file:   hello.py
Note that Git tells us how we could revert the step of adding a file in case of need. Having added a file to the staging area does not mean that this file has vanished from our working directory. As you can easily check, it is still there.
At this point it is worth emphasizing that we could collect several files in the staging area. We could then transfer all files to the repository in one single commit. Committing the file to the repository would be the next logical step. However, for the sake of illustration, we want to first modify our script. Our new script could read
for n in range(3):
    print("Hello world!")
The status now has changed to:
$ git status
On branch master

No commits yet

Changes to be committed:
  (use "git rm --cached <file>..." to unstage)
        new file:   hello.py

Changes not staged for commit:
  (use "git add <file>..." to update what will be committed)
  (use "git restore <file>..." to discard changes in working directory)
        modified:   hello.py
It reflects the fact that now there are two versions of our script hello.py.
The section “Changes to be committed” lists the file or files in the staging area.
In our example, Git refers to the version which we added, i.e. the script consisting
of just a simple line. This version differs from the file present in our working
directory. This two-line script is listed in the section “Changes not staged for commit”.
We could move it to the staging area right away or at a later point in case we want to commit
the two versions of the script separately. Note that the most recent version of the script
is no longer listed as untracked file because a previous version had been added and the
file is tracked now by Git.
Having a file in the staging are, we can now commit it by means of git commit.
Doing so will open an editor allowing to define a commit message describing the
purpose of the commit. The commit message should consist of a single line with
preferably at most 50 characters. If necessary, one can add an empty line followed
by a longer explanatory text. If a single-line commit message suffices, one can
give the message as a command line argument:
$ git commit -m 'simple hello world script added'
[master (root-commit) a5b522b] simple hello world script added
 1 file changed, 1 insertion(+)
 create mode 100644 hello.py
$ git status
On branch master
Changes not staged for commit:
  (use "git add <file>..." to update what will be committed)
  (use "git restore <file>..." to discard changes in working directory)
        modified:   hello.py

no changes added to commit (use "git add" and/or "git commit -a")
Checking the status, we see that our two-line script is still unstaged. We could add it to the staging area and then commit it. Since Git already tracks this file, we can carry out this procedure in one single step. However, this is only possible if we do not wish to commit more than one file:
$ git commit -a -m 'repetition of hello world implemented'
[master 011ce76] repetition of hello world implemented
 1 file changed, 2 insertions(+), 1 deletion(-)
(base) gli@gli-tp14-1:~/git_example$ git status
On branch master
nothing to commit, working tree clean
Now, we have committed two versions of our script as can easily be verified:
$ git log
commit 011ce76b848d6428e900373f177b1f6b2595a524 (HEAD -> master)
Author: Gert-Ludwig Ingold <gert.ingold@physik.uni-augsburg.de>
Date:   Wed Apr 27 15:31:01 2022 +0200

    repetition of hello world implemented

commit a5b522b125baa24f823df389b1b40f28b3a42bee
Author: Gert-Ludwig Ingold <gert.ingold@physik.uni-augsburg.de>
Date:   Wed Apr 27 15:28:41 2022 +0200

    simple hello world script added
As we had discussed in Section 2.2 the concept of distributed version control systems does not allow for sequential revision numbers. Our two commits can thus not be numbered as commit 1 and commit 2. Instead, commits in Git are identified by their SHA-1 checksum [3]. The output above lists the hashes consisting of 40 hexadecimal digits for the two commits. In practice, when referring to a commit, it is often sufficient to restrict oneself to the first 6 or 7 digits which typically characterize the commit in a unique way. To obtain idea of how sensitive the SHA-1 hash is with respect to small changes, consider the following examples:
$ echo Python|sha1sum
79c4e0b5abbd2f67a369ba6ee0b95438c38eb0cb  -
$ echo python|sha1sum
32886514c2621f81e01024aa84d0f829d2ce1fad  -
Now that we know how to commit one or more files, one can raise the question of how often files should be committed. Generally, the rule is to commit often. A good strategy is to combine changes in such a way that they form a logical unit. This approach is particularly helpful if one has to revert to a previous version. If a logical change affects several files, it is easy to revert this change. If on the other hand, a big commit comprises many logically different changes, one will have to sort out which changes to revert and which ones to keep. Therefore, it makes sense to aim at so-called atomic commits where a commit collects all file changes associated with a minimal logical change [4]. On the other hand, in the initial versions of program development, it often does not make sense to do atomic commits. The situation may change though as the development of the code progresses.
At the end of this section on the basic workflow, we point out one issue which in a sense could already be addressed in the initial setting up of the repository, but which we can motivate only now. Having our previous versions safely stored in the repository, we might be brave enough to refactor our script by defining a function to repeatedly printing a given text. Doing so, we end up with two files
# hello.py
from repeat import repeated_print

repeated_print("Hello world!", 3)
and
# repeat.py
def repeated_print(text, repetitions):
    for n in range(repetitions):
        print(text)
We verify that the scripts do what they are supposed to do
$ python hello.py
Hello world!
Hello world!
Hello world!
Everything works fine so that we add the two files to the staging area and check the status before committing.
$ git status
On branch master
Changes to be committed:
  (use "git restore --staged <file>..." to unstage)
        modified:   hello.py
        new file:   repeat.py

Untracked files:
  (use "git add <file>..." to include in what will be committed)
        __pycache__/
Everything looks fine except for the fact that there is an untracked directory
__pycache__. This directory and its content are created during the import of
repeat.py and should not go into the repository. After all, they are automatically
generated when needed. Here, it comes in handy to make use of a .gitignore file.
Each line in this file contains one entry which defines files to be ignored by Git.
For projects based on Python, Git proposes a .gitignore file starting with
the following lines:
# Byte-compiled / optimized / DLL files
__pycache__/
*.py[cod]
*$py.class
Lines starting with # are interpreted as comments. The second line excludes the
directory __pycache__ as well as its content. The star in the last two
lines can replace any number of characters. The third line will exclude all
files ending with .pyc, .pyo, and .pyc. For more details see git
help ignore and the collection of gitignore files, in particular Python.gitignore.
The .gitignore file should be put under version control as it might develop
over time.
2.6. Working with branches
In the previous section, the result of the command git status contained in
its first line the information On branch master. The existence of one branch
strongly suggests that there could be more branches and this is actually the case.
So far, we have been working on the branch which Git had created for us during
initialization and which happens to be called master by default. As the use
of branches can be very useful, we will discuss them in the following.
In the previous section, we had created a Git repository and made a few commits.
Suppose that we have also committed the refactored version of our script as well
as the .gitignore file. The history of our repository then looks as follows:
$ git log --oneline --graph --decorate --all
* aac6d17 (HEAD -> master) .gitignore for Python added
* 98628ce hello world script refactored
* 011ce76 repetition of hello world implemented
* a5b522b simple hello world script added
Before discussing the output, let us briefly comment on the options used in the
git log command. Usually, this command will be more verbose, giving the full
hash value of the commit, the name of the author and the date of the commit together
with the commit message. Using the switch --oneline, this information can be
reduced to a single line. Its content could be configured but we do not need to
do this here. The options --graph and --all will have an effect once more
than one branch is present. Then, we will obtain a graphical representation of
the commit tree, i.e. the relation between the different branches. In addition,
we will be shown information about all branches, not only the branch we are on.
Finally, --decorate shows us references existing for certain commits. In our
case, the commit aac6d17 is referred to as HEAD because that is the version
we are presently seeing in our working directory. This is also where the branch
master is positioned right now. The usefulness of this information will become
clear once we have more than one branch or when even working with remote branches.
The history documented by the output of git log is linear with the most
recent commit on top. As we have discussed earlier, Git is a distributed version
control system. Therefore, we have to expect that other developers are doing
work in parallel which at some time should connect to our work. Otherwise, we
could simply ignore these developers. Consequently, in general we cannot expect
the history of our repository to be as simple as it is up to now.
However, we do not need other developers to have several lines of development running in parallel for some time. Even for a single developer, it makes sense to keep different lines of development separated at least for some time. Suppose for the moment that you have a working program that is used to produce data, the production version of the program. At the same time, you want to develop this program further, e.g. in order to add functionality or to improve its speed. Such a development should be carried out separately from the production version so that the latter can easily be accessed in the repository at any time. Or you have a potentially good idea which you would like to try out, but you do not know whether this idea will make it into the main code. Again, it is useful to keep the exploration of your idea separate from the production version of your program. Of course, if the idea turns out to be a good one, it should be possible to merge the new code into the production version.
The solution to the needs occurring in these scenarios are branches. In a typical scenario, one would keep the production version in the master branch which in a sense forms the trunk of a tree. At a certain commit of the master branch, a new branch will take that commit as a parent on which further development of, e.g., a new aspect of the program is based. There could be different branches extending from various commits and a branch can have further branches. The picture of a tree thus seems quite appropriate. However, typically branches will not grow forever in their own direction. Ideally, the result of the development in a branch should ultimately flow back into the production code, a step referred to as merging.
Let us take a look at an example. As branches can become a bit confusing once you have several of them, it makes sense to make sure from time to time that you are still on the right branch. We have not created a new branch and therefore are on the master branch. This can be verified as follows:
$ git branch
* master
So far, we have only a single branch named master. The star in front indicates
that we are indeed on that branch.
Now suppose that the idea came up not to greet the whole world but a single person
instead. This implies a major change of the program and there is a risk that the
program used in production might not always be working correctly if we do our work
on the master branch. It is definitely time to create a new branch. We call the
new branch dev for development but we could choose any other name. In general,
it is a good idea to choose telling names, in particular as the number of branches
grows.
The new branch can be created by means of
$ git branch dev
We can verify the existence of the new branch:
$ git branch
  dev
* master
As the star indicates, we are still on the master branch, but a new branch named
dev exists. Switching back and forth between different branches is done by means
of the switch command. With the following commands, we got to the development
branch and back to the master branch while verifying where we are after each checkout:
$ git switch dev
Switched to branch 'dev'
$ git branch
* dev
  master
$ git switch master
Switched to branch 'master'
$ git branch
  dev
* master
In addition, we can check the history of our repository:
$ git log --oneline --graph --decorate --all
* aac6d17 (HEAD -> master, dev) .gitignore for Python added
* 98628ce hello world script refactored
* 011ce76 repetition of hello world implemented
* a5b522b simple hello world script added
Now, commit aac6d17 is also part of the branch dev. For the moment, the
new branch is not really visible as branch because we have not done any development.
Above, we have first created a new branch and then switched to the new branch. As one typically wants to switch to the new branch immediately after having created it, there exists a shortcut:
$ git switch -c dev
Switched to a new branch 'dev'
The option -c demands a new branch to be created.
Everything is set up now to work on the new idea. Let us suppose that at some point you arrive at the following script:
# hello.py
from repeat import repeated_print

def hello(name="", repetitions=1):
    if name:
        repeated_print(f"Hello, {name}", repetitions)
    else:
        repeated_print("Hello world!", repetitions)
After committing it, the commit log looks as follows:
$ git log --oneline --graph --decorate --all
* f113188 (HEAD -> dev) name as new argument implemented
* aac6d17 (master) .gitignore for Python added
* 98628ce hello world script refactored
* 011ce76 repetition of hello world implemented
* a5b522b simple hello world script added
The history is still linear, but clearly the master branch and the development
branch are in different states now. The master branch is still at commit
aac6d17 while the development branch is at f113188. At this point, it
is worth going back to the master branch and to check the content of
hello.py. At first, it might appear that we have lost our recent work but
this is not the case because we had committed the new version in the development
branch. Switching back to dev, we indeed find the new version of the
script.
During the development of the new script, we realized that it is a good idea to define a default value for the number of repetitions and we decide that it is a good idea to make a corresponding change in the master branch. Before continuing to work in the development branch, we perform the following steps:
check out the master branch
$ git switch mastermake modifications to
repeat.py# repeat.py def repeated_print(text, repetitions=1): for n in range(repetitions): print(text)commit the new version of the script
$ git commit -a -m 'default value for number of repetitions defined'check out the development branch
$ git switch dev
The commit history is no longer linear but has clearly separated into two branches:
$ git log --oneline --graph --decorate --all
* 1d9a25f (master) default value for number of repetitions defined
| * f113188 (HEAD -> dev) name as new argument implemented
|/
* aac6d17 .gitignore for Python added
* 98628ce hello world script refactored
* 011ce76 repetition of hello world implemented
* a5b522b simple hello world script added
Now it is time to complete the script hello.py by adding an exclamation mark
after the name and calling the new function hello:
# hello.py
from repeat import repeated_print

def hello(name="", repetitions=1):
    if name:
        s = "Hello, " + name + "!"
        repeated_print(s, repetitions)
    else:
        repeated_print("Hello world!", repetitions)

if __name__ == "__main__":
    hello("Alice", 3)
Before committing the new version, we start thinking about atomic commits. Strictly
speaking, we made two different kinds of changes. We have added the exclamation mark
and added the function call. Instead of going back and making the changes one after
the other, we can recall that the option -p allows to choose which changes to
add to the staging area:
$ git add -p hello.py
diff --git a/hello.py b/hello.py
index b2ee076..c287658 100644
--- a/hello.py
+++ b/hello.py
@@ -3,6 +3,9 @@ from repeat import repeated_print

 def hello(name="", repetitions=1):
     if name:
-        repeated_print(f"Hello, {name}", repetitions)
+        repeated_print(f"Hello, {name}!", repetitions)
     else:
         repeated_print("Hello world!", repetitions)
+
+if __name__ == "__main__":
+    hello("Alice", 3)
(1/1) Stage this hunk [y,n,q,a,d,s,e,?]?
Answering the question with s, i.e. split, we are offered the
possibility to add the two changes separately to the changing area. In this
way, we can create two separate commits. After actually doing the commits, we
arrive at the following history:
$ git log --oneline --graph --decorate --all
* a807c98 (HEAD -> dev) function call added
* d07dbda exclamation mark added
* f113188 name as new argument implemented
| * 1d9a25f (master) default value for number of repetitions defined
|/
* aac6d17 .gitignore for Python added
* 98628ce hello world script refactored
* 011ce76 repetition of hello world implemented
* a5b522b simple hello world script added
Now, it is time to make the new functionality available for production, i.e. to merge the commits from the development branch into the master branch. To this end, we switch to the master branch and merge the development branch:
$ git switch master
Switched to branch 'master'
$ git merge dev
Merge made by the 'recursive' strategy.
 hello.py | 9 ++++++++-
 1 file changed, 8 insertions(+), 1 deletion(-)
$ git log --oneline --graph --decorate --all
*   53e12db (HEAD -> master) Merge branch 'dev'
|\
| * a807c98 (dev) function call added
| * d07dbda exclamation mark added
| * f113188 name as new argument implemented
* | 1d9a25f default value for number of repetitions defined
|/
* aac6d17 .gitignore for Python added
* 98628ce hello world script refactored
* 011ce76 repetition of hello world implemented
* a5b522b simple hello world script added
In this case, Git has made a so-called three-way merge based on the common ancestor
of the two branches (aac6d17) and the current versions in the two branches
(1d9a25f) and (a807c98). It is interesting to compare the script repeat.py
in these three versions. The version in the common ancestor was:
# repeat.py aac6d17
def repeated_print(text, repetitions):
    for n in range(repetitions):
        print(text)
In the master branch, we have
# repeat.py 1d9a25f
def repeated_print(text, repetitions=1):
    for n in range(repetitions):
        print(text)
while in the development branch, the script reads
# repeat.py a807c98
def repeated_print(text, repetitions):
    for n in range(repetitions):
        print(text)
Note that in 1d9a25f a default value for the variable repetitions is
present while it is not in a807c98. The common ancestor serves to resolve
this discrepancy. Obviously, a change was made in the master branch while it
was not done in the development branch. Therefore, the change is kept. The
other modifications in the branches were not in contradiction, so that the
merge could be done automatically and produced the desired result.
The life of the development branch does not necessarily end here if we decide
to continue to work on it. In fact, the branch dev continues to exist until
we decide to delete it. Since all work done in the development branch is now
present in the master branch, we decide to delete the branch dev:
$ git branch -d dev
Deleted branch dev (was a807c98).
An attempt to delete a branch which was not fully merged, will be rejected. This
could be the case if the idea developed in a branch turns out not to be a good
idea after all. The deletion of the branch can be forced by replacing the option
-d by -D.
In general, one cannot expect a merge to run as smoothly as in our example. Frequently,
a so-called merge conflict arises. This is quite common if different developers work
in the same part of the code and their results are incompatible. For the sake of example,
let us assume that we add a doc string to the repeated_print function but choose
a different text in the master branch and in the development branch. In the master branch
we have
# repeat.py in master
def repeated_print(text, repetitions=1):
    """print text repeatedly

    """
    for n in range(repetitions):
        print(text)
while in the development branch we have chosen a different doc string
# repeat.py in dev
def repeated_print(text, repetitions):
    """print text several times"""
    for n in range(repetitions):
        print(text)
The commit history of which we only show the more recent part now becomes a bit more complex:
* c3ab8cb (HEAD -> dev) added a doc string
| * cc484da (master) doc string added
| *   53e12db Merge branch 'dev'
| |\
| |/
|/|
* | a807c98 function call added
* | d07dbda exclamation mark added
* | f113188 name as new argument implemented
| * 1d9a25f default value for number of repetitions defined
|/
* aac6d17 .gitignore for Python added
We switch to the master branch and try to merge once more the development branch:
$ git switch master
Switched to branch 'master'
$ git merge dev
Auto-merging repeat.py
CONFLICT (content): Merge conflict in repeat.py
Automatic merge failed; fix conflicts and then commit the result.
This time, the merge fails and Git informs us about a merge conflict. At this point, Git needs to be told which version of the doc string should be used in the master branch. Let us take a look at our script:
# repeat.py
<<<<<<< HEAD
def repeated_print(text, repetitions=1):
    """print text repeatedly

    """
=======
def repeated_print(text, repetitions):
    """print text several times"""
>>>>>>> dev
    for n in range(repetitions):
        print(text)
There are two blocks separated by =======. The first block starting with
<<<<<<< HEAD is the present version in the master branch where we are right
now. The second block terminated by >>>>>>> dev stems from the development
branch. The reason for the conflict lies in the different doc strings. In such a
situation, Git needs help. The script should now be brought into the desired
form by using an editor or a tool to handle merge conflicts. We choose
# repeat.py
def repeated_print(text, repetitions=1):
    """print text repeatedly

    """
    for n in range(repetitions):
        print(text)
but the other version or a version with further modifications would have been possible as well. In order to tell Git that the version conflict has been resolved, we add it to the staging area and commit it as usual. The history now looks as follows:
*   d10bdbb (HEAD -> master) merge conflict resolved
|\
| * c3ab8cb (dev) added a doc string
* | cc484da doc string added
* | 53e12db Merge branch 'dev'
|\|
| * a807c98 function call added
| * d07dbda exclamation mark added
| * f113188 name as new argument implemented
* | 1d9a25f default value for number of repetitions defined
|/
* aac6d17 .gitignore for Python added
While the use of branches can be an extremely valuable technique even for a single developer, branches will inevitably appear in a multi-developer environment. A good understanding of branches will therefore be helpful in the following section.
2.7. Collaborative code development with GitLab
So far, we have only worked within a single developer scenario and a local Git repository was sufficient. However, scientific research is often carried out in teams with several persons working on the same project at the same time. While a distributed version control system like Git allows each person to work with her or his local repository for some time, it will become necessary at some point to share code. One way would be to grant all persons on the project read access to all local repositories. However, in general such an approach will result in a significant administrative load. It is much more common to exchange code via a central server, typically a GitLab server run by an institution or a service like GitHub.
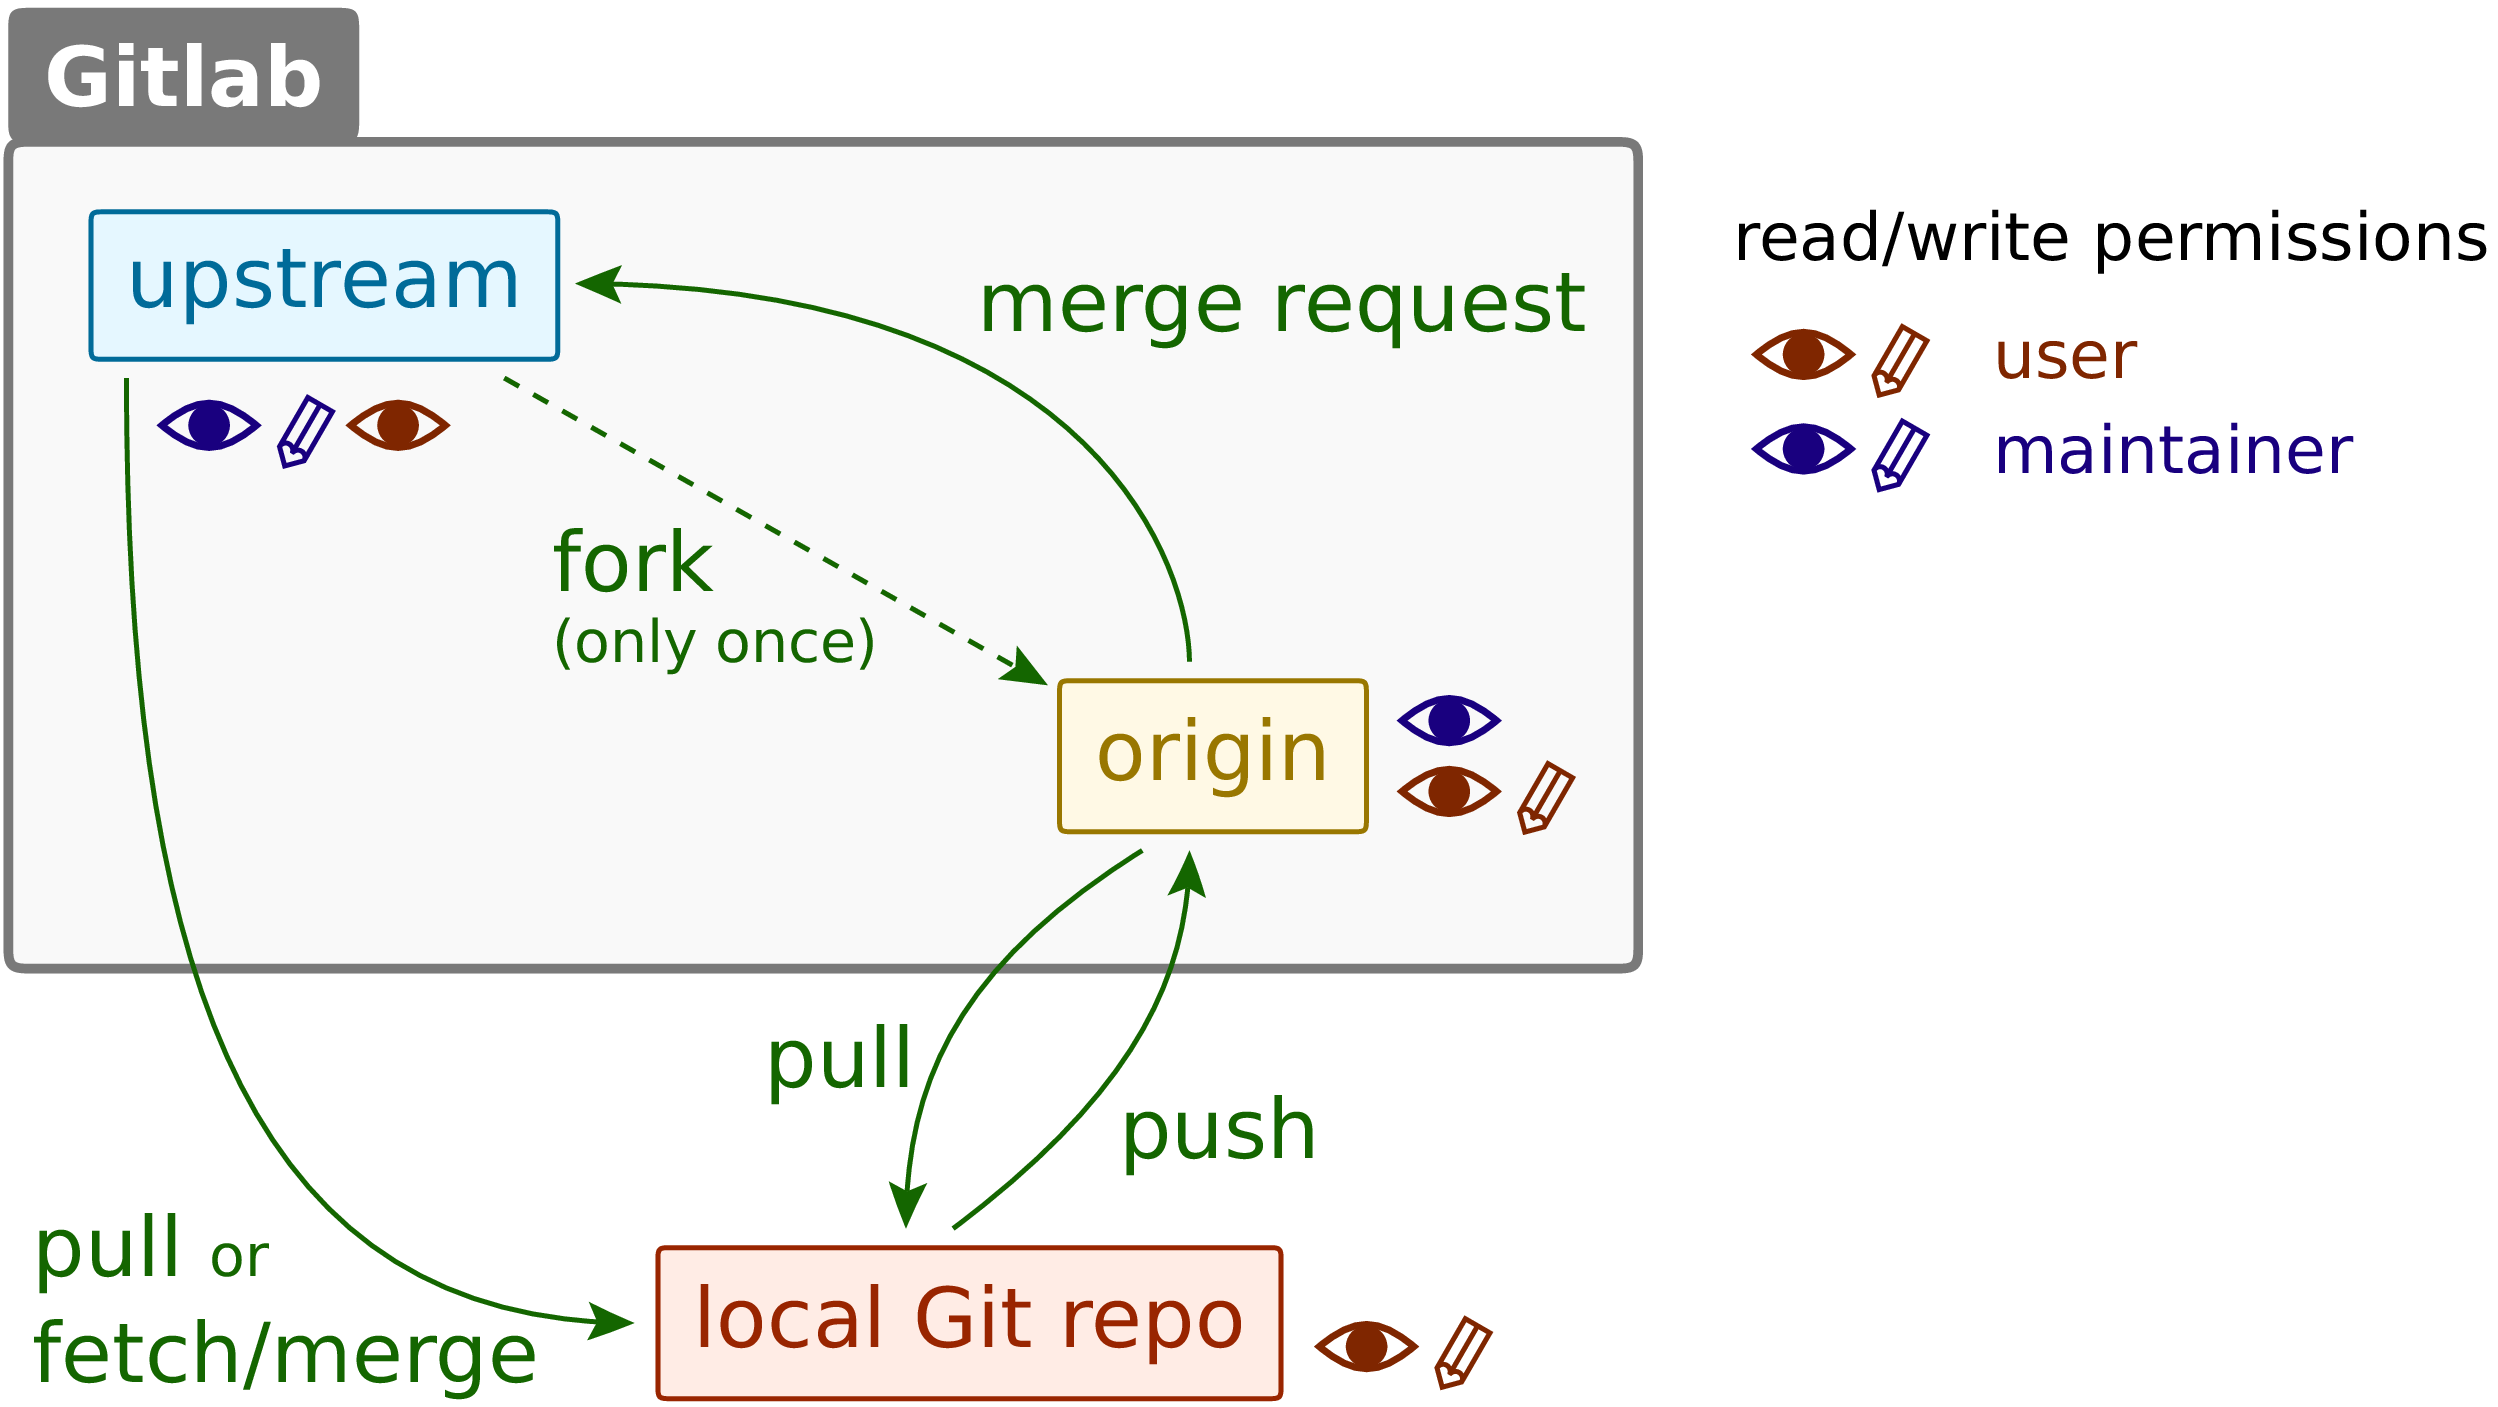
Figure 2.5 Workflow for collaborative development in a distributed version control system with a GitLab instance as central server.
Independently of whether one uses a GitLab server or GitHub, the typical setup
looks like depicted in Figure 2.5 and consists of three repositories. In
order to understand this setup, we introduce to roles. The user is representative
of one of the individual developers while the maintainer controls the main project
repository. As a consequence of their respective roles, the user has read and
write access to her or his local repository while the maintainer has read and
write access to the main project repository, often referred to as upstream.
Within a project team, every member should be able to access the common code
base and therefore should have read access to upstream. In order to avoid that
the maintainer needs read access to the user’s local repository, it is common
to create a third repository often called origin to which the user has read
and write access while the maintainer has read access. In order to facilitate
the rights management, origin and upstream are usually hosted on the same
central server. At same point in time, the user creates origin by a process
called forking, thereby creating her or his own copy of upstream. This process
needs only to be done once. Afterwards, the code can flow in counter-clockwise
direction in Figure 2.5. The individual steps are as follows:
The user can always get the code from the
upstreamrepository, e.g. to use it as basis for the future development. There are two options, namelygit pulland the two-step processgit fetchandgit mergewhich we will discuss below.Having read and write access both on the local repository and the
originrepository, the user cangit pushto move code to the central server. Withgit pull, code can also be brought from the central server to a local repository. The latter is particularly useful if the user is working on several machines with individual local repositories.As long as the user has no write access to
upstream, only the maintainer can transfer code from the user’sorigintoupstream. Usually, the user will inform the maintainer by means of a merge request that code is being ready to be merged into theupstreamrepository [5]. After an optional discussion of the suitability of the code, the maintainer can merge the code into theupstreamrepository.
After these conceptual considerations, we discuss a more practical example. The
maintainer of the project will be called Big Boss with username boss and
she or he starts by creating a repository for a project named example. We
will first go through the steps required to set up the project and then focus
on how one remotely interacts with this repository either as an owner of the
repository or a collaborator who contributes code via his or her repository.

Figure 2.6 Creation of a new project in a GitLab repository.
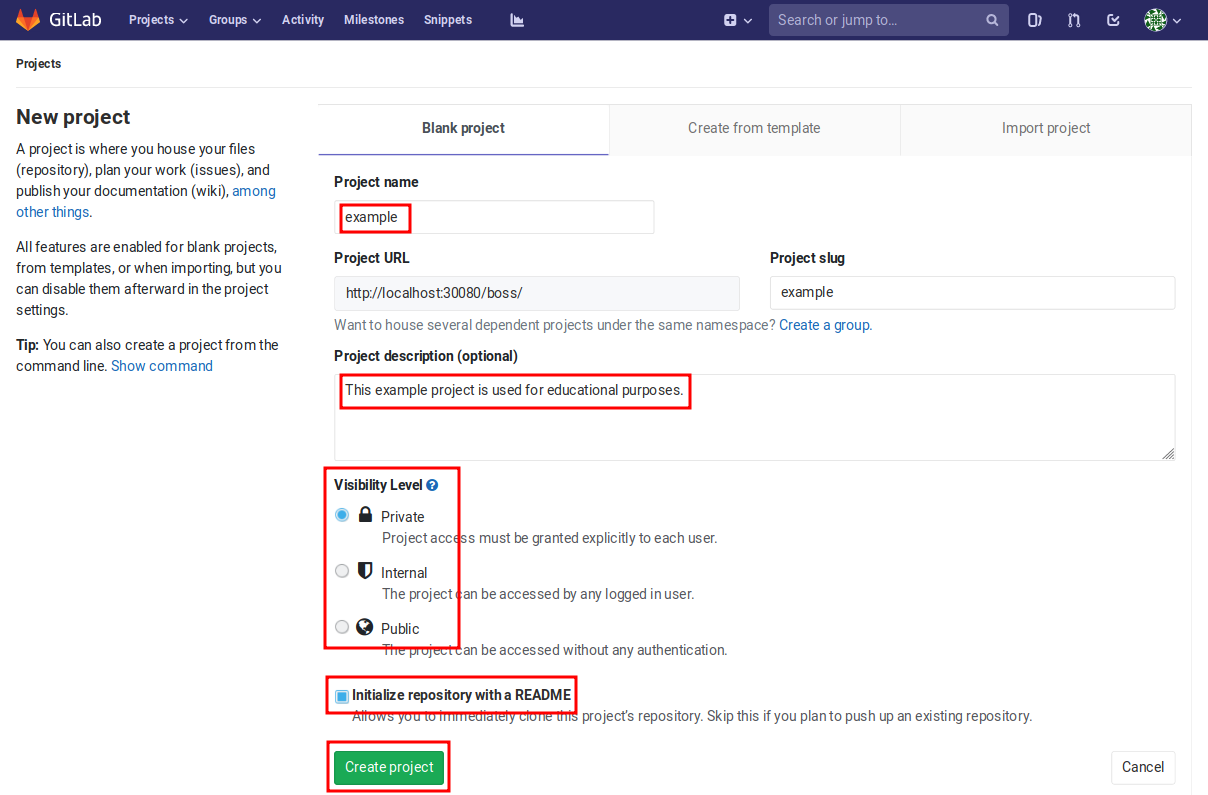
Figure 2.7 During the creation of a project its name and its visibility level need to be defined. In addition, it makes sense to add a project description and to initialize the repository with a README file.
After logging into a GitLab server, one finds in the dashboard on the top of the screen the possibility to create a new project as shown in Figure 2.6. In order to actually create a new project, some basic information is needed as shown in Figure 2.7. Mandatory are the name as well as the visibility level of the project. A private project will only be visible to the owner and members who were invited to join the project. Public projects, on the other hand, can be accessed without any authentication. It is recommended to add a short description of the project so that its purpose becomes apparent to visitors of the project page. In addition, it is useful to add at least a short README file. This README file initially will contain the name of the repository and the project description. It can be extended over time by adding information useful for visitors of the project page. Creating a README file also ensures that the repository contains at least one file.
Tip
Markup can be used to format the README page. Markup features include
headers, lists, web links and more. GitLab and GitHub recognize markdown
(file extension .md) and restructured text (file extension .rst).
We recommend to take a look at the Markdown Style Guide of GitLab
and to experiment with different formatting possibilities. This is also a
good opportunity to exercise your version control skills. You can check the
effect of the markup by taking a look at the project page.
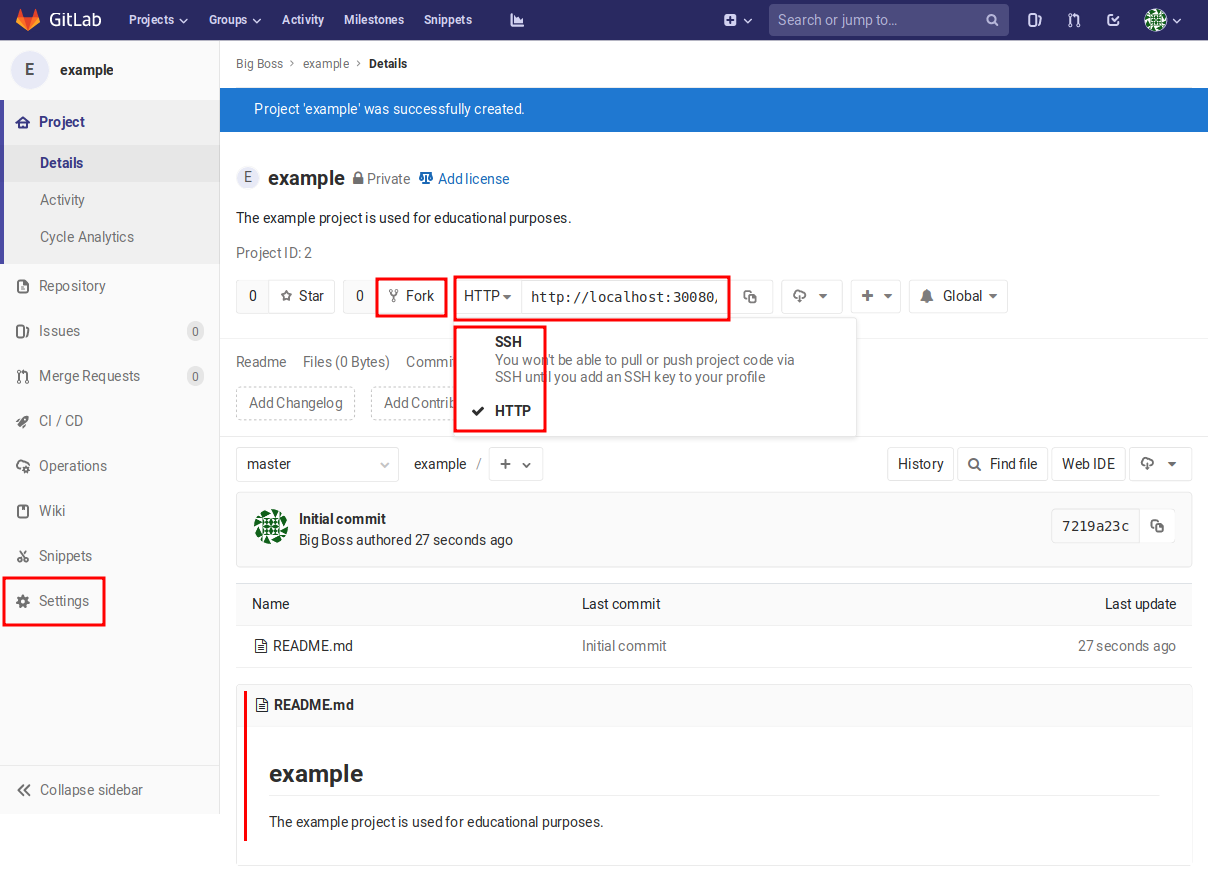
Figure 2.8 The new repository can be accessed via the HTTP and SSH protocols. Users with access to the repository can also fork it.
The project page shown in Figure 2.8 contains relevant
elements for users collaborating on the project. There is the possibility to
create a fork of the project. According to the workflow represented in
Figure 2.5, forking a project creates a new repository usually referred
to as origin which is based on the repository referred to as upstream.
The key point in forking is to create a repository to which the user has write
access, which need not be the case for the original project.
Furthermore, the screen depicted in Figure 2.8 contains information about the URL under which the repository can be accessed. We will need this information later on. As the figure shows, the repository can be accessed via the HTTP protocol which will ask for the username and password, if necessary. An alternative is the SSH protocol which requires that a public SSH key of the user is stored on the GitLab server. Finally, Figure 2.8 demonstrates how the information entered when setting up the project is used to create a minimal README file which is displayed in a formatted way at the bottom of the project page.
Tip
Information on how to create a SSH key can be found for example in the section GitLab and SSH keys of the GitLab documentation.
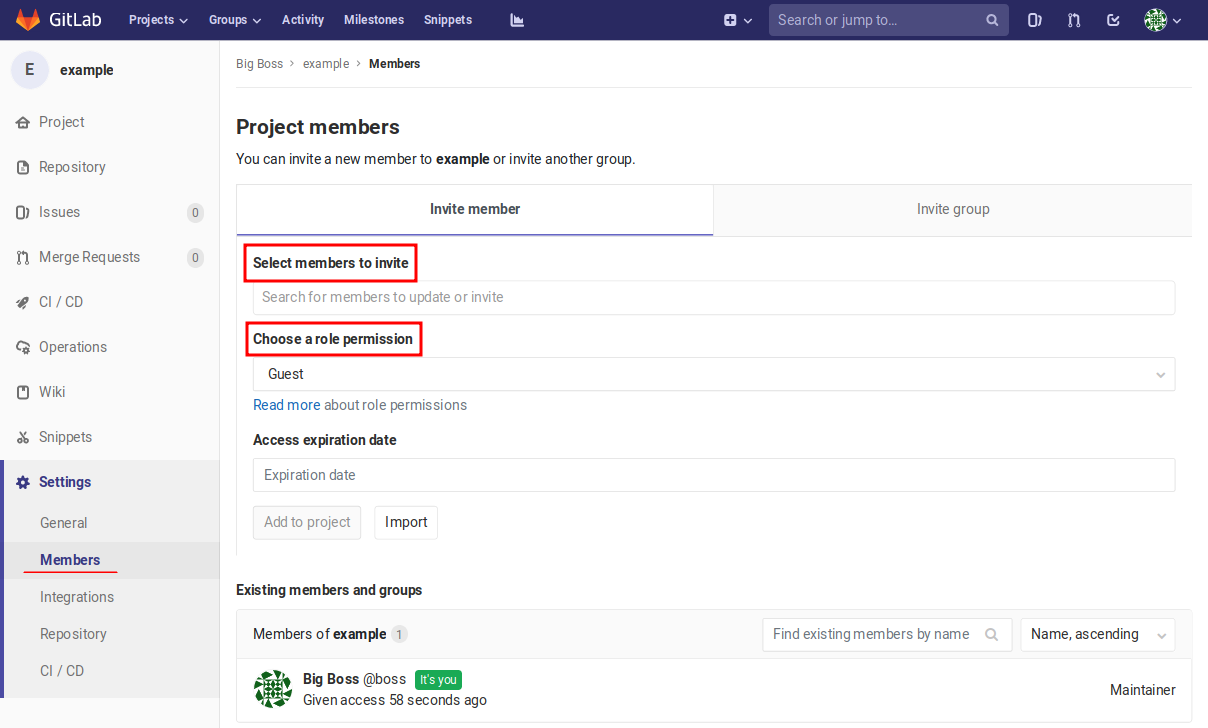
Figure 2.9 On the setting page, other users can be invited to join the project and their permissions can be defined.
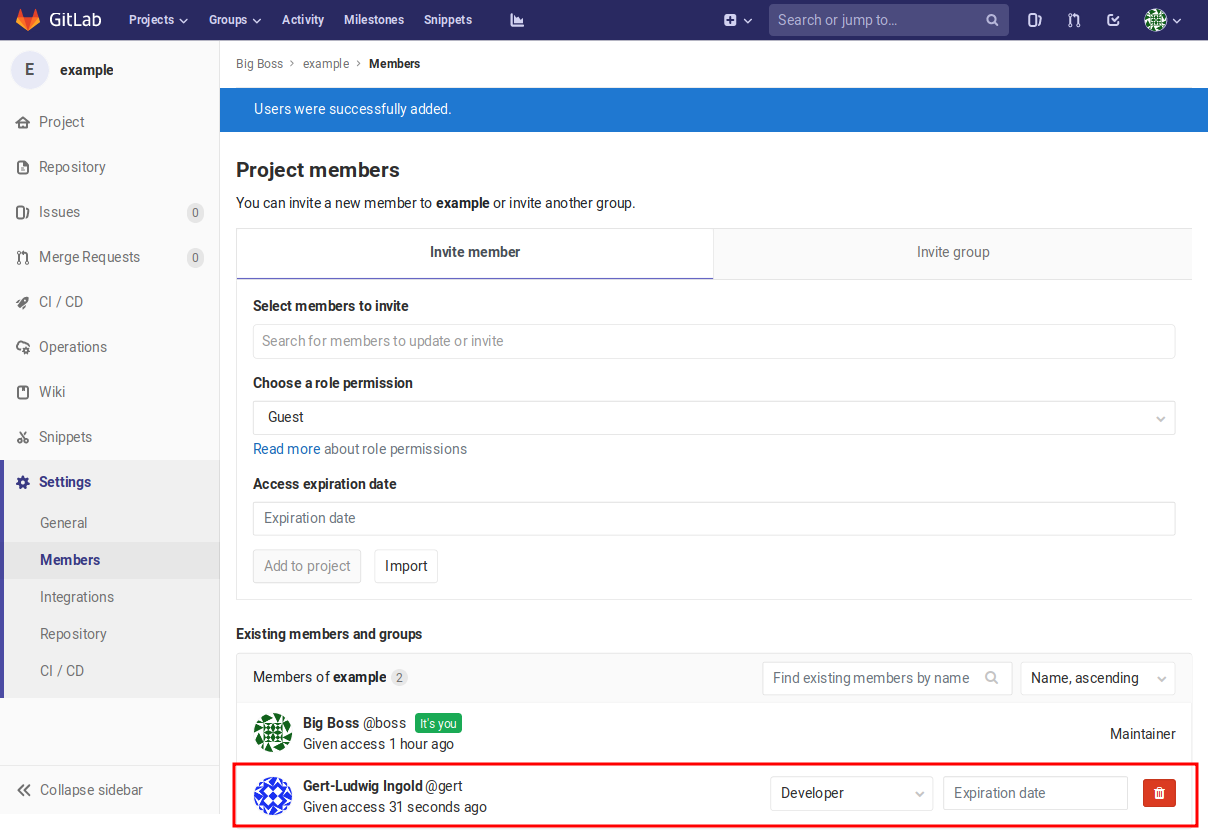
Figure 2.10 A new team member has been added to the project as developer.
The previous discussion had already the idea of collaborative work on the project in mind. However, for the moment nobody has access to the project except the owner who had created the project. Additional team members can be invited in the settings menu by accessing the members page shown in Figure 2.9. Here, team members can be invited and their permissions can be defined. If a new team member should be able to contribute code to the project, he or she while typically take on the role of a developer. Figure 2.10 shows that a new team member has been successfully added in the role of a developer. The project maintainer can remove team members at any time by clicking on the red icon on the right.
We are now in a position to explore the collaborative workflow shown in Figure 2.5. There exists an alternative approach relying on protected branches which we do not cover here [6].
For the following discussion, we assume that user boss has created a
project called example which can be accessed as indicated in
Figure 2.8. In our case, the HTTP access would be via
the address http://localhost:30080/boss/example.git and for SSH access we
would use ssh://git@localhost:30080/boss/example.git. In a real
application, be sure to replace these addresses by the addresses indicated on
the project page. Maintainer boss has invited developer gert to the
project team and the latter now has to set up his system to be able to
contribute to project example. During the discussion, it might be useful to
occasionally take a look at Figure 2.5 in order to connect the details to
the overall picture.
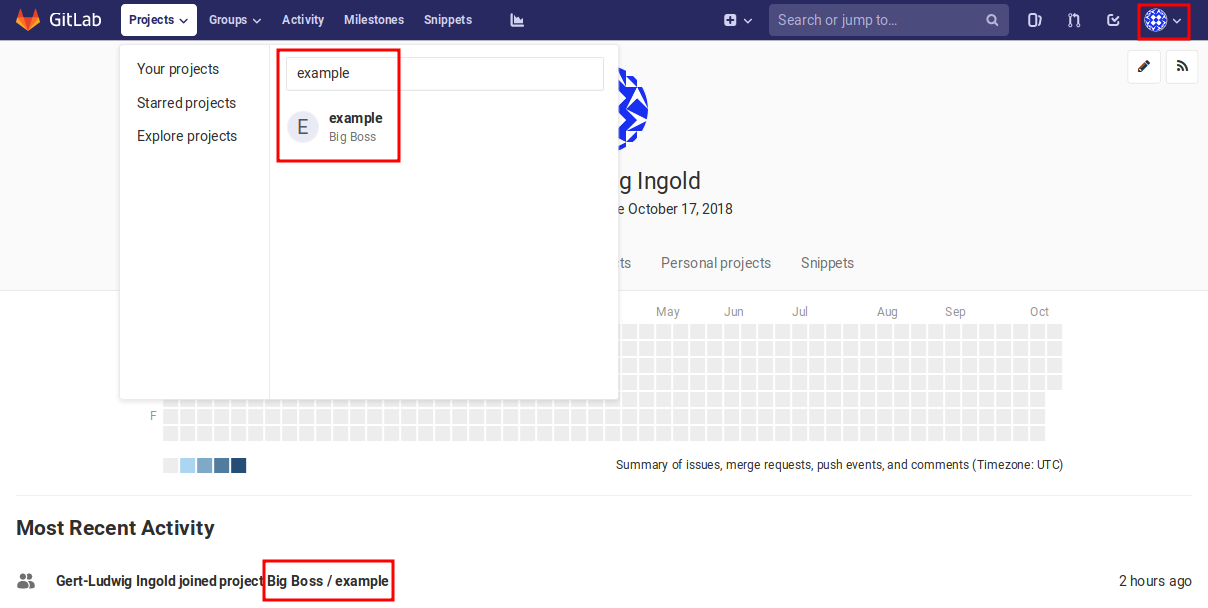
Figure 2.11 In order to navigate to a repository, one can for example search for it or use a direct link if one has joined the project recently. This page can be accessed by choosing “Profile” from the avatar menu in the upper right corner.
In a first step, user gert logs into the GitLab server and goes to the
project example of user boss. A possibility to do so consists in
searching for the project name in the dashboard as shown in
Figure 2.11. On the user’s profile page, there might be
alternative ways like in Figure 2.11 where the repository is
listed because the user joined it recently. At a later stage, it would also be
possible to go via the forked repository or the list of contributed projects.
In any case, the user gert will see a page looking almost like the one
displayed in Figure 2.8. In particular, there will be a
fork button which initiates the creation of a fork of the original project as
a project of user gert. In the notation of Figure 2.5, a repository
origin has been created as a copy of the present state of the repository
upstream.
According to Figure 2.5, the developer now needs to create a local
repository for the project based on his or her own repository on the GitLab
server, i.e. the repository referred to as origin. Using the URL shown
in Figure 2.8, the repository is cloned into a local
directory as follows:
$ git clone ssh://git@localhost:30022/gert/example.git
Cloning into 'example' ...
remote: Enumerating objects: 3, done.
remote: Counting objects: 100% (3/3), done.
remote: Compressing objects: 100% (2/2), done.
remote: Total 3 (delta 0), reused 3 (delta 0)
Receiving objects: 100% (3/3), done.
$ ls -a example
.  ..  .git  README.md
In the third line, the passphrase for the SSH key needs to be given. If the
HTTP protocol were used, username and password would have been requested. In
the last line we see that the directory .git has been created without the
need of initializing the repository. By default, git clone transfers the
repository with its complete history, unless only part of the history is
requested by means of the --depth argument.
In contrast to the previous sections, we are no longer only working with a
local repository but also with the two remote repositories origin and
upstream on the GitLab server. To find out which remote repositories are
locally known, we go to the directory where the repository is located and use:
$ git remote -v
origin  ssh://git@localhost:30022/gert/example.git (fetch)
origin  ssh://git@localhost:30022/gert/example.git (push)
These lines tell us that the developer’s repository example on the remote
server is available for read and write under the name origin. However, we
also need access to the repository usually referred to as upstream. This
can be achieved by telling Git about this remote repository:
$ git remote add upstream ssh://git@localhost:30022/boss/example.git
$ git remote -v
origin  ssh://git@localhost:30022/gert/example.git (fetch)
origin  ssh://git@localhost:30022/gert/example.git (push)
upstream        ssh://git@localhost:30022/boss/example.git (fetch)
upstream        ssh://git@localhost:30022/boss/example.git (push)
Now we can refer to the original remote repository as upstream. The existence
of a channel for pushing does not necessarily imply that we have the permission
to actually write to upstream.
Being a developer on the example project, we want to contribute code to the
project. Already in our discussion of the workflow within a purely local
repository we have seen that it might be useful to do development work in
dedicated branches. The same is true in a setup involving remote repositories.
In the discussion of merge requests we will give an additional argument in
favor of using dedicated branches for different aspects of development. While
various approaches to the use of branches are possible, a judicious choice
would be to attribute a special role to the master branch by keeping it in sync
with the upstream repository. By branching off from the master repository,
the development activities can be kept close to the code on upstream, thereby
facilitating a later merge into the main code base.
The developer decides to contribute a “Hello world” script to the example project
and first creates a new branch named hello:
$ git checkout -b hello
Switched to a new branch 'hello'
$ git branch
* hello
  master
We already know how to commit a script to the new branch. After doing so, the content of the main directory is:
$ ls -a
.  ..  .git  hello.py  README.md
and the history reads:
$ git log --oneline --decorate
* 313a6a5 (HEAD -> hello) hello world script added
* 7219a23 (origin/master, origin/HEAD, master) Initial commit
The local branch master as well as the remote branch origin/master are still
at the initial commit 7219a23 while the local branch hello is one commit
ahead. The remote repository origin is not aware of the new branch yet. Furthermore,
the local repository has not yet any information about the remote repository upstream.
In a next step, the developer pushes the new commit or several of them to the
remote repository origin where he or she has write permission:
$ git push -u origin hello
Counting objects: 3, done.
Delta compression using up to 4 threads.
Compressing objects: 100% (2/2), done.
Writing objects: 100% (3/3), 328 bytes | 328.00 KiB/s, done.
Total 3 (delta 0), reused 0 (delta 0)
remote:
remote: To create a merge request for hello, visit:
remote:   http://localhost:30080/gert/example/merge_requests/new?merge_request%5Bsource_branch%5D=hello
remote:
To ssh://localhost:30022/gert/example.git
 * [new branch]      hello -> hello
Branch 'hello' set up to track remote branch 'hello' from 'origin'.
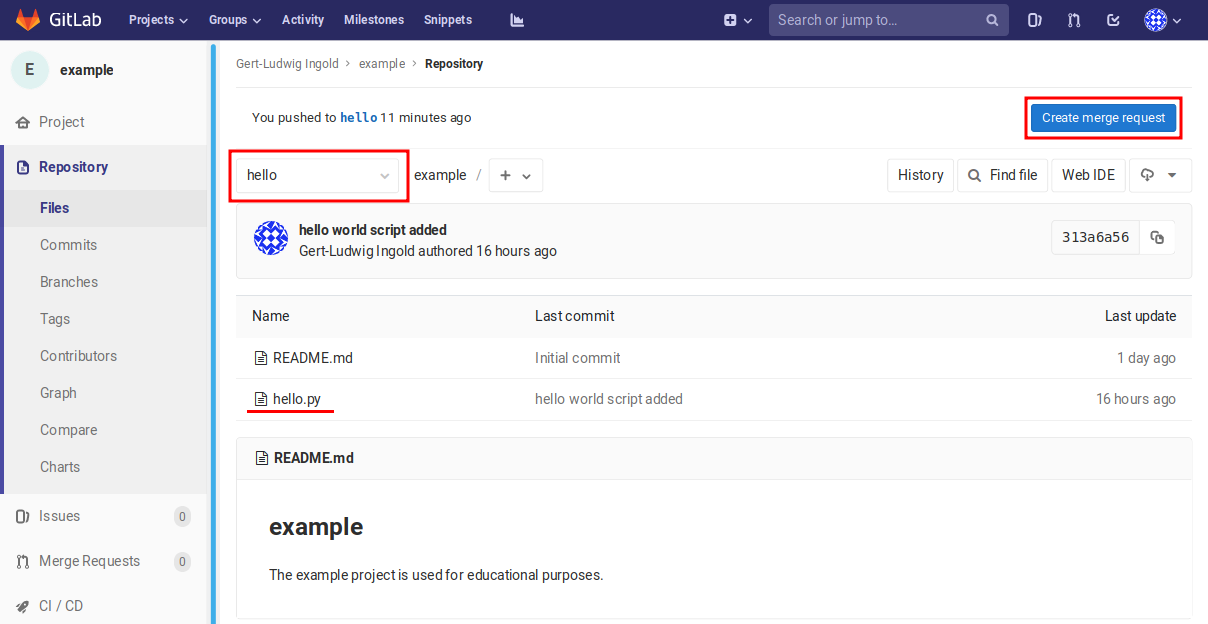
Figure 2.12 The script hello.py has been successfully pushed to the remote branch
origin/hello. It can now be brought to the remote repository upstream
by means of a merge request.
Actually, two things have happened here at the same time. The commit 313a6a5 was
pushed to the branch hello on origin. Because of the option -u, the local
branch was associated with the remote branch. From now on, if one wants to push
commits from the local branch hello to the corresponding remote branch, it suffices
to use git push. This is not only shorter to type but also avoids to accidentally
push commits to the wrong branch. We can verify that the commit is now present on the
remote server either by means of:
$ git log --oneline --decorate
313a6a5 (HEAD -> hello, origin/hello) hello world script added
7219a23 (origin/master, origin/HEAD, master) Initial commit
where commit 313a6a5 now also refers to origin/hello. Alternatively,
one can take a look at the project page on the GitLab server which will look
like Figure 2.12. Make sure that the branch has been changed
from master to hello because that is where the script has been pushed
to. It is not and should not be present in origin/master at this point.
Following the workflow displayed in Figure 2.5, the developer might now want
to contribute the new script to the upstream repository. If the developer has
no write access to this repository, he or she can make a merge request as we will
explain now. If, on the other hand, the developer has write access to the upstream
repository, he or she could push the script directly there. However, even with
with write access it might be preferable to contribute code via a merge request
and this could be the general policy applying even to maintainers. The advantage
of merge requests is that other team members can automatically be informed about
new contributions and have a chance to discuss them before they become part of
the upstream repository. As long as the person merging the submitted code
is different from the submitter, a second pair of eyes can take a look at the
code and spot potential problems. In the end, the project team or the team leaders
have to decide which policy to follow.
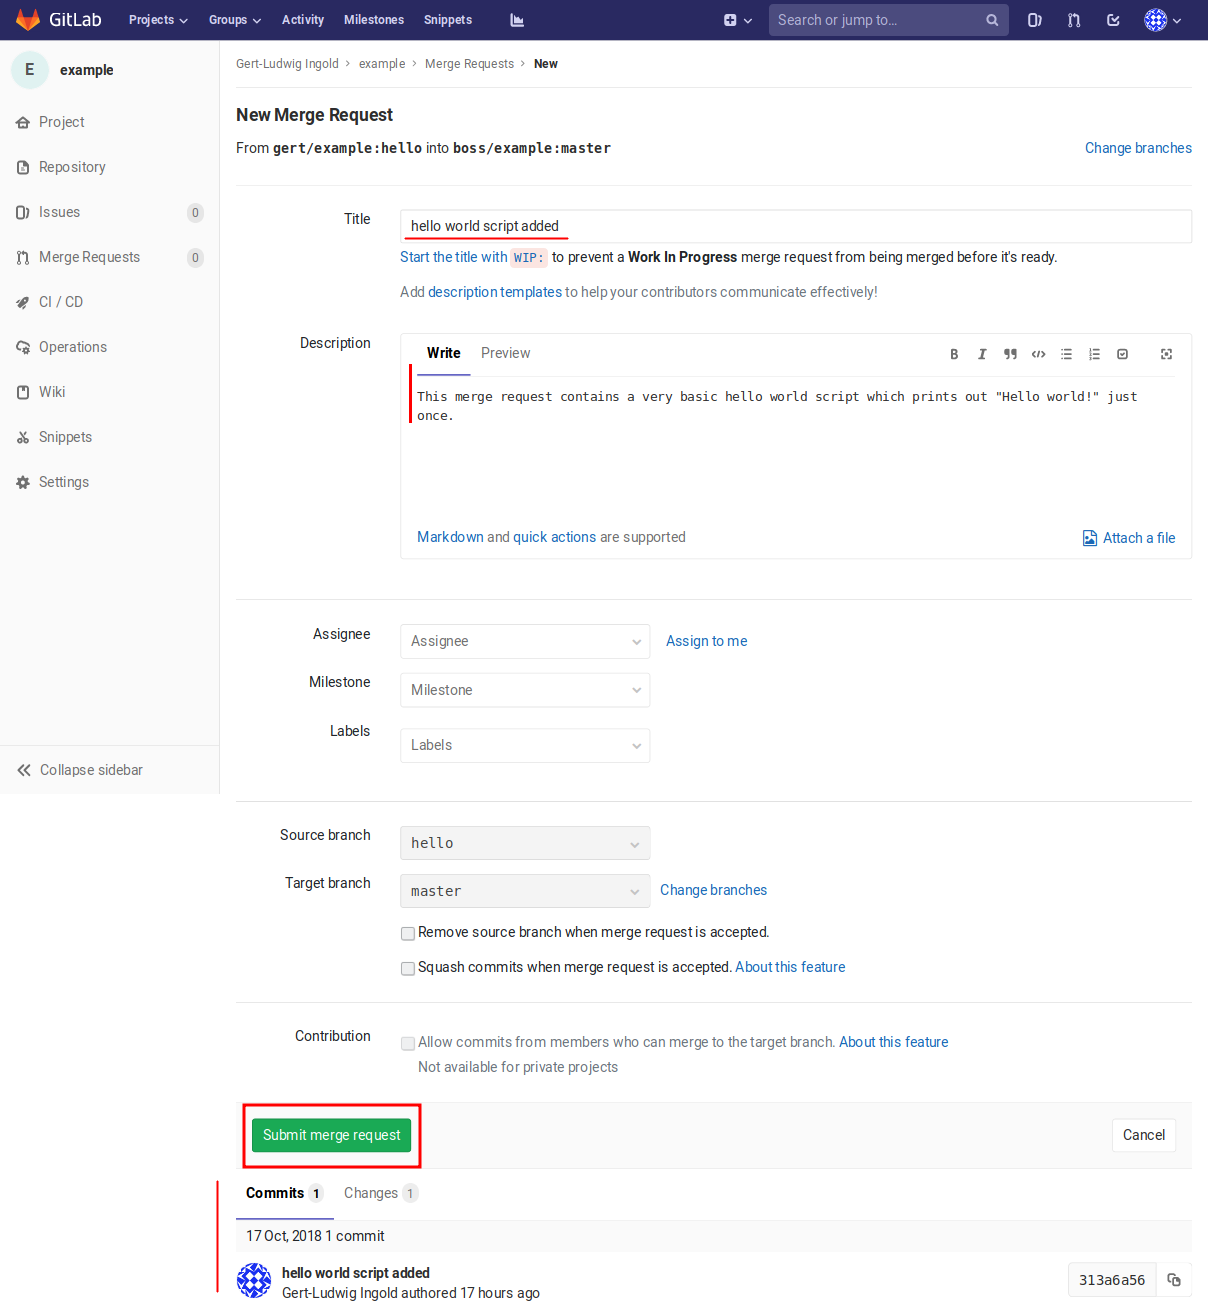
Figure 2.13 GitLab page for the preparation of a new merge request.
On the project page shown in Figure 2.12, there is a button in the upper right with the title “Create merge request” which does precisely what this title says. Clicking this button will bring up a page like the one depicted in Figure 2.13. It is important to give a descriptive title as it will appear in a list of potentially many merge requests. In addition, the purpose of the merge request as well as additional relevant information like design considerations should be stated in the description field. Optionally, labels can be attributed to the merge request or merge requests can be assigned to milestones. As these possibilities are mostly of interest in larger projects, we will not discuss them any further here.
At this point, it is appropriate to give the use of branches a bit more consideration.
Suppose that the merge request is not merged into upstream right away and
that the developer is continuing development. After some time, he or she will
commit the new work to the hello branch on origin. Then this new commit
will automatically be part of the present merge request even though the new
commit might not be logically related to the merge request. In such a situation,
it is better to start a new branch, probably based on the local master branch.
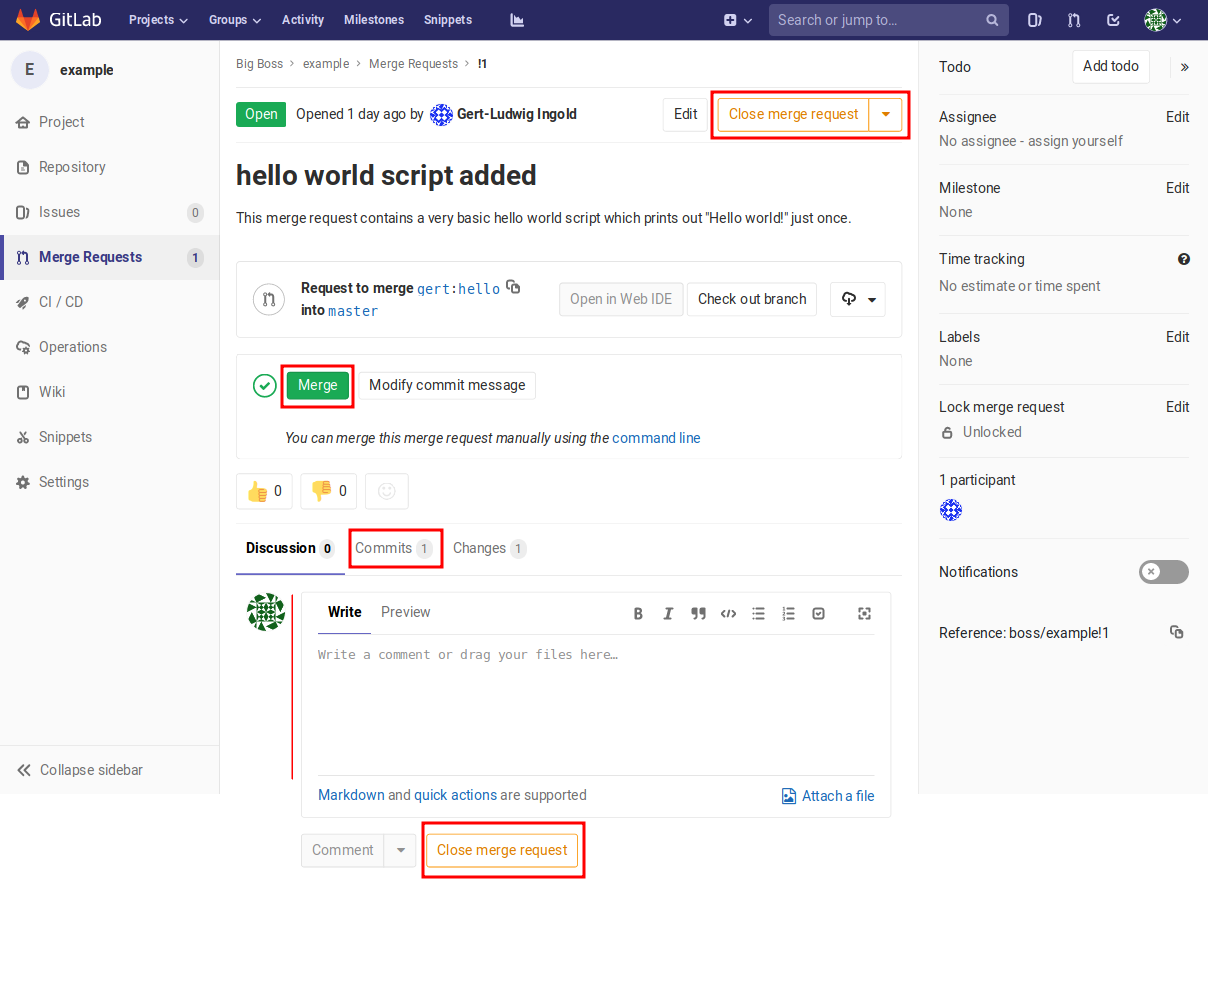
Figure 2.14 A merge request can be discussed. It can be merged and closed or even closed without merging if the code has been found to be unsuitable for the project. The page shown here assumes that the user logged in has write permission for the project.
Even though the merge request is based on code in the repository origin, it
will appear in the list of merge requests for the repository upstream because
that is where the code should be merged. The page of an open merge request looks
similar to Figure 2.14. It offers the possibility to view the
commits included in the merge request and to comment on them. Persons with write
permission on upstream have the possibility to merge the commits contained
in the merge request and to close it afterwards. If the code should not be
included in upstream, the merge request can also be closed without merging.
In this case, reasons should of course be given in the discussion section.
Let us assume that the maintainer merges the commits in the merge request without
further discussion and closes the merge request.
The developer’s code has successfully found its way to the upstream repository.
However, his or her local repository does not yet reflect this change. It is now
time to complete the circle depicted in Figure 2.5 and to get the changes
from the upstream repository into the local repository. We will assume that
we organise our branches in such a way that the local master branch should be
kept in sync with the master branch in the upstream repository. If we
are still in the development branch hello, it is now time to go back to the
master branch:
$ git checkout master
Switched to branch 'master'
Your branch is up-to-date with 'origin/master'.
Now, we have two options. With git pull upstream master, the present state
of the remote branch master on upstream would be downloaded and merged
into the present local branch. For a better control of the process, one can split
it into two steps:
$ git fetch upstream
remote: Enumerating objects: 1, done.
remote: Counting objects: 100% (1/1), done.
remote: Total 1 (delta 0), reused 0 (delta 0)
Unpacking objects: 100% (1/1), done.
 * [new branch]    master     -> upstream/master
$ git merge upstream/master
Updating 7219a23..e55831a
Fast-forward
 hello.py | 1 +
 1 file changed, 1 insertion(+)
 create mode 100644 hello.py
git fetch gets new objects from the master branch and git merge upstream/master
merges the objects from the remote branch upstream/master. The history of the
local master repository looks as follows:
$ git log --oneline --graph --decorate --all
*   e55831a (HEAD -> master, upstream/master) Merge branch 'hello' into 'master'
|\
| * 313a6a5 (origin/hello, hello) hello world script added
|/
* 7219a23 (origin/master, origin/HEAD) Initial commit
As we can see, the local master branch and the remote master branch on the upstream
repository are in sync while the master branch on the origin repository is still
in its original state. This makes sense because the hello world script was pushed to
the hello repository on the origin repository, but not its master branch.
We can change this by pushing the local master branch to origin.
Before doing so, let us remove the hello branch which we do not need anymore:
$ git push origin --delete hello
To ssh://localhost:30022/gert/example.git
 - [deleted]         hello
$ git branch -d hello
Deleted branch hello (war 313a6a5).
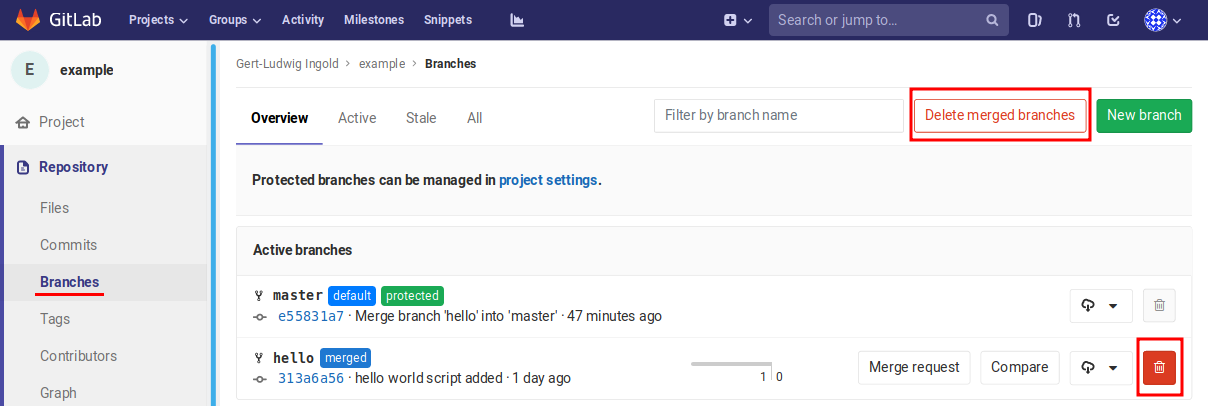
Figure 2.15 At the tab “Settings - Branches” individual branches or all merged branches can be removed.
The first command deleted the remote branch. As an alternative way, one can use
the GitLab web interface as shown in Figure 2.15. There
individual branches or all merged branches can be removed. However, the local
references to the remote branches are not yet deleted. If one wants to remove
references to branches on origin which do no longer exist, one can use
git remote prune origin. The second command above deletes the local
branch, provided that no unmerged commits are still present. One can force
deletion of the branch with the option -D but may risk the loss of data.
Using -D instead of -d should thus be done with care.
After pushing the local master branch to origin, the log looks as follows:
$ git push origin master
Counting objects: 1, done.
Writing objects: 100% (1/1), 281 bytes | 281.00 KiB/s, done.
Total 1 (delta 0), reused 0 (delta 0)
To ssh://localhost:30022/gert/example.git
   7219a23..e55831a  master -> master
$ git log --oneline --decorate --graph
*   e55831a (HEAD -> master, upstream/master, origin/master, origin/HEAD) Merge branch 'hello' into 'master'
|\
| * 313a6a5 hello world script added
|/
* 7219a23 Initial commit
All three master branches are now in the same state and we have completed a basic
development cycle.
2.8. Sundry topics
2.8.1. Stashing
In the previous sections, we have only discussed the basic workflows with Git and certainly did not even attempt to be complete. In the day-to-day work with a Git repository, certain problems occasionally arise. Some of them will be discussed in this section.
For the first scenario, let us assume that we have created a dev branch
where we modified the hello.py script and committed the new version. We
can then change between branches without any problem:
$ git checkout -b dev
Switched to a new branch 'dev'
$ cat hello.py
print("Hello world!")
print("Hello world!")
print("Hello world!")
$ git commit -a -m'repetitive output of message'
[dev 01dc5a1] repetitive output of message
 1 file changed, 2 insertions(+)
$ git checkout master
Switched to branch 'master'
Your branch is up-to-date with 'origin/master'.
$ git checkout dev
Switched to branch 'dev'
The situation is different if we do not commit the changes. In the following
example, we have implemented the repetitive output by means of a for loop
but did not commit the change. Git now does not allow us to change to the
master branch because we might lose data:
$ cat hello.py
for _ in range(3):
    print("Hello world!")
$ git checkout master
error: Your local changes to the following files would be overwritten by checkout:
        hello.py
Please commit your changes or stash them before you switch branches.
Aborting
We could force Git to change branches by means of the option -f but probably
it is a better idea to follow the advice given by Git and to commit or stash the changes. We
know about committing but what does stashing mean? The idea is to pack away the
uncommitted changes so that they can be retrieved when we return to the dev
branch:
$ git stash
Saved working directory and index state WIP on dev: 01dc5a1 repetitive output of message
$ git checkout master
Switched to branch 'master'
Your branch is up-to-date with 'origin/master'.
$ git checkout dev
Switched to branch 'dev'
$ cat hello.py
print("Hello world!")
print("Hello world!")
print("Hello world!")
After stashing the changes, Git allowed us to switch back and forth between the
master and dev branch. However, after returning to the dev branch
it looks as if the script with the for loop were lost. Fortunately, this is not
the case as becomes clear from listing the content of the stash. One can retrieve
the modified script by popping it from the stash:
$ git stash list
stash@{0}: WIP on dev: 01dc5a1 repetitive output of message
$ git stash pop
On branch dev
Changes not staged for commit:
  (use "git add <file>..." to update what will be committed)
  (use "git checkout -- <file>..." to discard changes in working directory)

        modified:       hello.py

no changes added to commit (use "git add" and/or "git commit -a")
Dropped refs/stash@{0} (049ca57b4dda40d0869129482e2d216f82186d75)
$ cat hello.py
for _ in range(3):
    print("Hello world!")
As the code example given above demonstrates, one can list the content of the stash. However, after some time it is easy to forget that one has stashed code in the first place. Therefore, stashing is most suited for brief interruptions where one needs to change branches for a short period of time. Otherwise, committing the changes might be a better solution.
2.8.2. Tagging
As we know, a specific revision of the code can be specified by means of its
SHA1 value. Occasionally, it is useful to tag a revision with a name for easier
reference. For example, one might want to introduce different versions of the
code tagged by labels like v1, v2 and so on.
The present revision can be tagged as follows:
$ git tag -a v1 -m "first production release"
Here, the option -a means that an annotated tag is created which will
have additional information very similar to a commit. There can be e.g. a message,
here given by means of the option -m, the name of the tagger and the date.
This information and more can be displayed:
$ git show v1
tag v1
Tagger: Gert-Ludwig Ingold <gert.ingold@physik.uni-augsburg.de>
Date:   Wed Oct 24 14:23:44 2018 +0200

first production release

commit d08b08646d933e0b7240cbbdbb194143ede1f29c (HEAD -> master, tag: v1)
Merge: a459aec 7a7b8f7
Author: Gert-Ludwig Ingold <gert.ingold@physik.uni-augsburg.de>
Date:   Mon Oct 22 09:28:03 2018 +0200

    Merge branch 'dev'
It is also possible to tag older revisions by referring to a specific commit like in the following example:
$ git tag -a v0.1 -m "prerelease version" a459aec
$ git tag
v0.1
v1
$ git log --oneline -n5
d08b086 (HEAD -> master, tag: v1) Merge branch 'dev'
7a7b8f7 added doc string
a459aec (tag: v0.1) doc string added
ac805d5 Merge branch 'dev'
41e9e21 function call added
The logs demonstrate that indeed the tags are connected with a certain commit. In addition to annotated tags, there are also so-called light-weight tags which cannot contain further attributes. Usually, light-weight tags are employed if they are only temporarily needed.
So far, the tag is only known to the local Git repository. In order for the tag
to be known also on a remote repository like origin, one needs to push the
information about the tag:
$ git push origin v1
Enumerating objects: 1, done.
Counting objects: 100% (1/1), done.
Writing objects: 100% (1/1), 187 bytes | 187.00 KiB/s, done.
Total 1 (delta 0), reused 0 (delta 0)
To ssh://localhost:30022/gert/myrepo.git
 * [new tag]         v1 -> v1
The tag is now also visible on the project’s web page as shown in Figure 2.16.
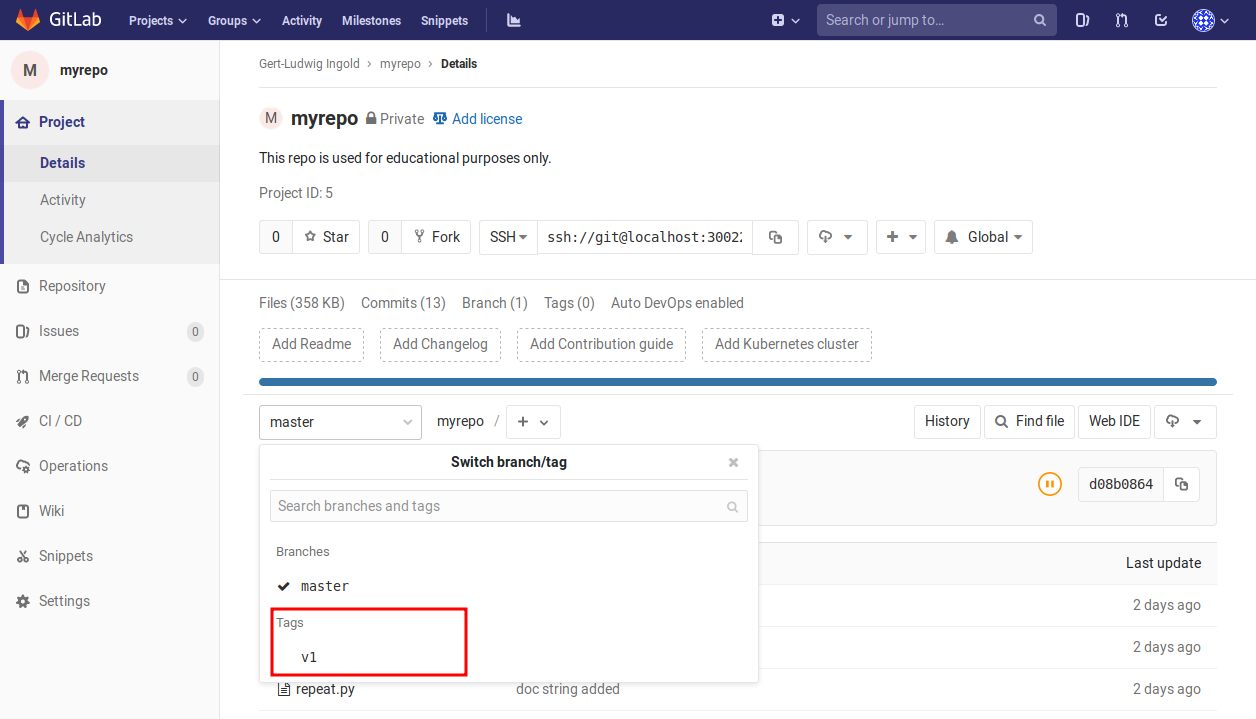
Figure 2.16 After a tag has been pushed to the remote repository, it can be used on the project’s web page to navigate to the commit associated with the tag.
2.8.3. Detached head state
In Section 2.6, we have seen that we can move between the last commits in different branches. However, we may not only be interested in the most recent version of the code. After all, the whole point in keeping the history of a project is to be able to inspect older versions.
There is a number of different ways of specifying commits in Git and we will only
mention a few ones. One possibility is to use the SHA1 value of the commit. In general,
the seven first hex digits will be sufficient. If a commit has been tagged as
described in the previous section, the tag can be used instead. It is also possible
to use a relative notation. For example, the first ancestor of HEAD can be
obtained by means of HEAD^. Note though that if the commit was generated by
a merge, more than one ancestors can exist. For details of how in such situation
to address a commit relative to another commit is explained in the git documentation,
see e.g.,
$git help revisions
GITREVISIONS(7)                   Git Manual                   GITREVISIONS(7)

NAME
       gitrevisions - Specifying revisions and ranges for Git

SYNOPSIS
       gitrevisions

DESCRIPTION
       Many Git commands take revision parameters as arguments. Depending on
       the command, they denote a specific commit or, for commands which walk
       the revision graph (such as git-log(1)), all commits which are
       reachable from that commit. For commands that walk the revision graph
       one can also specify a range of revisions explicitly.

       In addition, some Git commands (such as git-show(1)) also take revision
       parameters which denote other objects than commits, e.g. blobs
       ("files") or trees ("directories of files").

SPECIFYING REVISIONS
       A revision parameter <rev> typically, but not necessarily, names a
       commit object. It uses what is called an extended SHA-1 syntax. Here
       [...]
Here, we reproduced only part of the help text.
Now let us suppose that the recent history of our repository looks as follows:
d08b086 (HEAD -> master, tag: v1) Merge branch 'dev'
7a7b8f7 added doc string
a459aec (tag: v0.1) doc string added
ac805d5 Merge branch 'dev'
41e9e21 function call added
1bac36d exclamation mark appended
d8d7313 default value for repetitions added
c95fa0e new argument 'name' added
For some reason, we want to take a look at commit 41e9e21 and decide to
check this commit out:
$ git checkout 41e9e21
Note: checking out '41e9e21'.

You are in 'detached HEAD' state. You can look around, make experimental
changes and commit them, and you can discard any commits you make in this
state without impacting any branches by performing another checkout.

If you want to create a new branch to retain commits you create, you may
do so (now or later) by using -b with the checkout command again. Example:

  git checkout -b <new-branch-name>

HEAD is now at 41e9e21 function call added
$ git branch
* (HEAD detached at 41e9e21)
  master
The important point here is that the branch is in a so-called “detached head state”. At first sight, this branch behaves like a usual branch where we can look around and even commit changes. However, once we leave the branch, there is no way to get back to these commits. As Git explains in the message reproduced above, one needs to check out the branch into a regular new branch if one wants to keep the commits generated in a branch in a “detached head state”. If one forgets to do so, Git will give the following warning:
$ git checkout master
Warning: you are leaving 1 commit behind, not connected to
any of your branches:

  4d252a9 'how are you' added

If you want to keep it by creating a new branch, this may be a good time
to do so with:

 git branch <new-branch-name> 4d252a9

Switched to branch 'master'
The new branch needs to be created before garbage collection destroys the
commit 4d252a9.
2.8.4. Manipulating history
Travelling back in time and changing the past can have strange effects on the future. What is well known to readers of science fiction also applies to some extent to users of Git. Occasionally, it is tempting to correct the history of the repository. Reasons can be for example typos in commit messages or stupid mistakes in the code. When code is concerned, it usually is preferable to simply correct mistakes in a new commit. On the other hand, it sometimes might make sense to remove a certain commit from the history. It also happens that right after committing code one realizes that there was a typo in the commit message. Correcting the message is still possible and usually is not harmful.
Generally speaking, one can get away with manipulations of the history of a repository as long as the part of the history affected by the manipulations is still completely local. Once the relevant commits have been pushed to a remote repository and others have pulled these commits into their own repositories, changing the history is a potentially great way to make fellow developers very unhappy, something which you definitely want to avoid.
Frequently it happens that one commits code and realizes immediately that
the commit message contains a typo. It is rather straightforward to correct
such a mistake locally. Suppose that “How are you?” has been added to the
output of the script hello.py and that the recent history looks as follows:
$ git log --oneline -n5
c7be5c2 (HEAD -> master) 'Who are you' added
89f459f Merge branch 'dev'
7a7b8f7 added doc string
a459aec (tag: v0.1) doc string added
ac805d5 Merge branch 'dev'
Clearly, the commit message is wrong and even worse, it is misleading. The commit message of the last commit can be amended in the following way:
$ git commit --amend -m"'How are you?' added"
[master 3eec1a6] 'How are you?' added
 Date: Fri Oct 26 14:49:03 2018 +0200
 1 file changed, 1 insertion(+), 1 deletion(-)
$ git log --oneline -n5
3eec1a6 (HEAD -> master) 'How are you?' added
89f459f Merge branch 'dev'
7a7b8f7 added doc string
a459aec (tag: v0.1) doc string added
ac805d5 Merge branch 'dev'
If the option -m is omitted, an editor will be opened to allow you to enter
the new commit message.
If you have made a commit erroneously and want to get rid of it, git reset can
be used to reset HEAD to another commit. For example, HEAD^ denotes the
first parent of HEAD so that the last commit can be removed by:
$ git reset --hard HEAD^
HEAD is now at 89f459f Merge branch 'dev'
$ git log --oneline -n5
89f459f (HEAD -> master) Merge branch 'dev'
7a7b8f7 added doc string
a459aec (tag: v0.1) doc string added
ac805d5 Merge branch 'dev'
41e9e21 function call added
As a result, commit 3eec1a6 is gone.
More general changes are possible by means of an interactive rebase. Rebase applies commits on top of a base tip and doing so interactively allows to decide which commits should actually be applied. While a rebase can be done within a single branch, we will directly proceed to the discussion of a rebase across two branches. Suppose that we have the following history:
$ git log --oneline --graph --all
* 06933ed (master) headline modified
| * e0ac1ba (HEAD -> dev) add __name__ to output
| * 8c167c1 Test output amended
|/
* 99091f2 Test script added
The test script test.py should output some headline and the content of the
variable __name__. In the development branch, this headline has been
modified and a print statement for the variable __name__ was added. On the
other hand, the headline has been modified in the master branch as well. For
further development, the headline from the master branch should be used, so
commit 8c167c1 should be replaced by 06933ed. So solve this issue, an
interactive rebase is done on master:
$ git rebase -i master
An editor opens and displays the following information:
pick 8c167c1 Test output amended
pick e0ac1ba add __name__ to output

# Rebase 06933ed..e0ac1ba onto 06933ed (2 commands)
#
# Commands:
# p, pick <commit> = use commit
# r, reword <commit> = use commit, but edit the commit message
# e, edit <commit> = use commit, but stop for amending
# s, squash <commit> = use commit, but meld into previous commit
# f, fixup <commit> = like "squash", but discard this commit's log message
# x, exec <command> = run command (the rest of the line) using shell
# d, drop <commit> = remove commit
# l, label <label> = label current HEAD with a name
# t, reset <label> = reset HEAD to a label
# m, merge [-C <commit> | -c <commit>] <label> [# <oneline>]
# .       create a merge commit using the original merge commit's
# .       message (or the oneline, if no original merge commit was
# .       specified). Use -c <commit> to reword the commit message.
#
# These lines can be re-ordered; they are executed from top to bottom.
#
# If you remove a line here THAT COMMIT WILL BE LOST.
#
#       However, if you remove everything, the rebase will be aborted.
#
#
# Note that empty commits are commented out
Replacing pick by drop in front of commit 8c167c1 and leaving the
editor, git answers
Auto-merging test.py
CONFLICT (content): Merge conflict in test.py
error: could not apply e0ac1ba... add __name__ to output

Resolve all conflicts manually, mark them as resolved with
"git add/rm <conflicted_files>", then run "git rebase --continue".
You can instead skip this commit: run "git rebase --skip".
To abort and get back to the state before "git rebase", run "git rebase --abort".

Could not apply e0ac1ba... add __name__ to output
The merge conflict needs to be resolved in the usual way so that the rebase can be continued:
$ git add test.py
$ git rebase --continue
[detached HEAD 7c9c8d1] add __name__ to output
 1 file changed, 2 insertions(+), 1 deletion(-)
Successfully rebased and updated refs/heads/dev.
The rebase operation was successfully carried out and the new history is:
$ git log --oneline --graph --all
* 7c9c8d1 (HEAD -> dev) add __name__ to output
* 06933ed (master) headline modified
* 99091f2 Test script added
Now, commit 7c9c8d1 is following directly after commit 06933ed.
Two comments are in order here. The SHA1 hash of the commit with the commit
message add __name__ to output has changed from e0ac1ba to 7c9c8d1.
Rebasing thus will create significant problems if the commits of the development
branch have been pushed to a remote branch and pulled from there by other developers
before the rebasing has been carried out. It is therefore strongly recommended
that rebasing is done only if local commits are applied. On the other hand, as we
have seen, a rebase gives us the opportunity to take into account what has happened
in the master branch and to resolve merge conflicts. In this way it can be avoided
that a merge request containing commits from the development branch will contain
merge conflicts with the master branch.